• Skip to primary navigation
  • Skip to main content
  • Skip to primary sidebar
  • Skip to footer
All American Construction

All American Construction

Strong Roofs, Fair Settlements—Serving LA & Orange County.

  • About Us
  • Roof Services
    • Storm Restoration, Simplified
    • Insurance Claim
    • Emergency Roof Repair near me: Local Experts
    • Gutters
    • Siding
    • Window replacement
    • Residential & Commercial Painting
  • Commercial Roofing
    • EPDM
    • Fluid Applied Systems
    • Commercial Green Roofs
    • Commercial Metal Roofing
    • Modified Bitumen & Built-up Roofing
    • Roof Coatings
    • Steep Slope
    • Thermoplastic Membranes
    • Preventative Maintenance
  • Residential Roofing
    • Asphalt Shingles
    • Metal Roofing
    • Clay Tile
    • Cedar Roofs
    • Slate Roofs
    • Synthetic Roofs
  • Contact Us

Uncategorized

Rebuilding Lives After Wildfires and Winds in LA and Orange County

January 19, 2025 by Gerry Winik

Wildfire Damage Repair Los Angeles and Wind Damage Everywhere, Including Orange County

Wildfire damage repair in Los Angeles is essential for homeowners and businesses recovering from recent disasters. Along with powerful winds in Orange County causing roof damage, countless properties have been left devastated. Roofs torn off, charred structures, and families wondering how to begin rebuilding—if this is your reality, you’re not alone. There’s a clear path forward, and we’re here to help.

wildfire damage repair Los Angeles

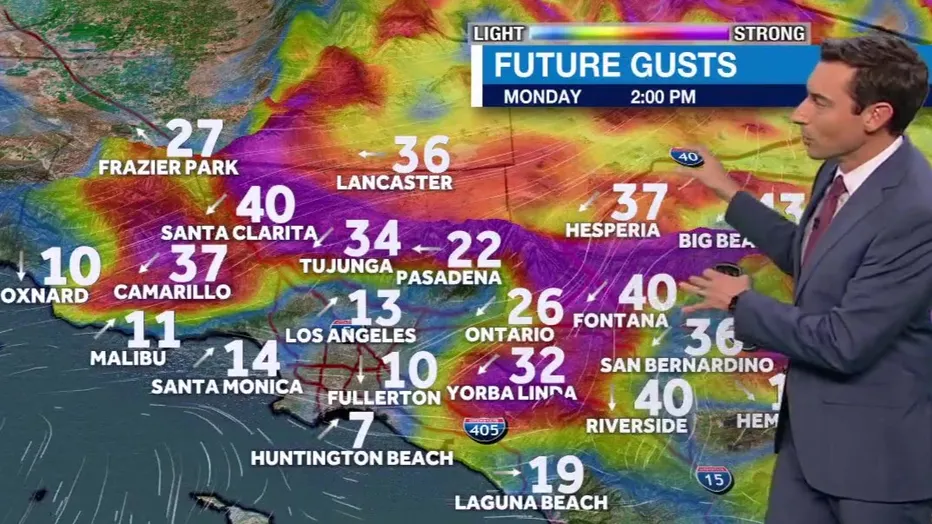
A Fire Weather Watch is in effect for Los Angeles and Ventura counties as Santa Ana winds bring critical fire conditions. Winds: Gusts between 30-50 mph, with mountain areas potentially reaching 60 mph. Humidity: Extremely low, around 10% or less. Stay vigilant, and monitor updates as conditions can escalate to a Red Flag Warning.

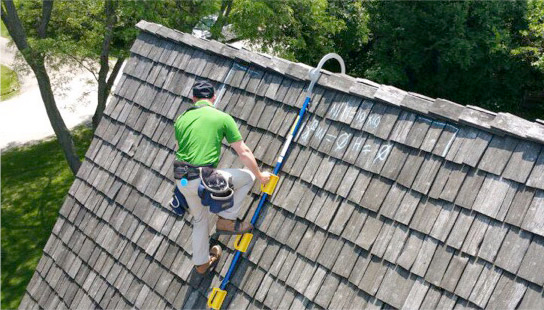
Step 1: Assess the Damage

Start by inspecting your property for visible damage:

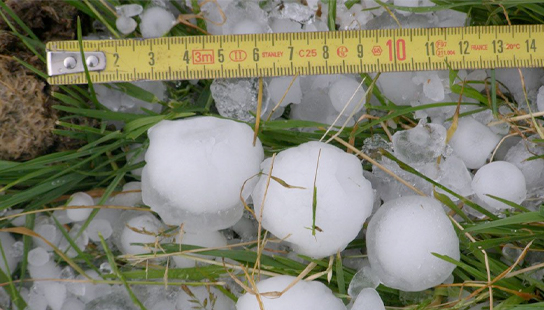
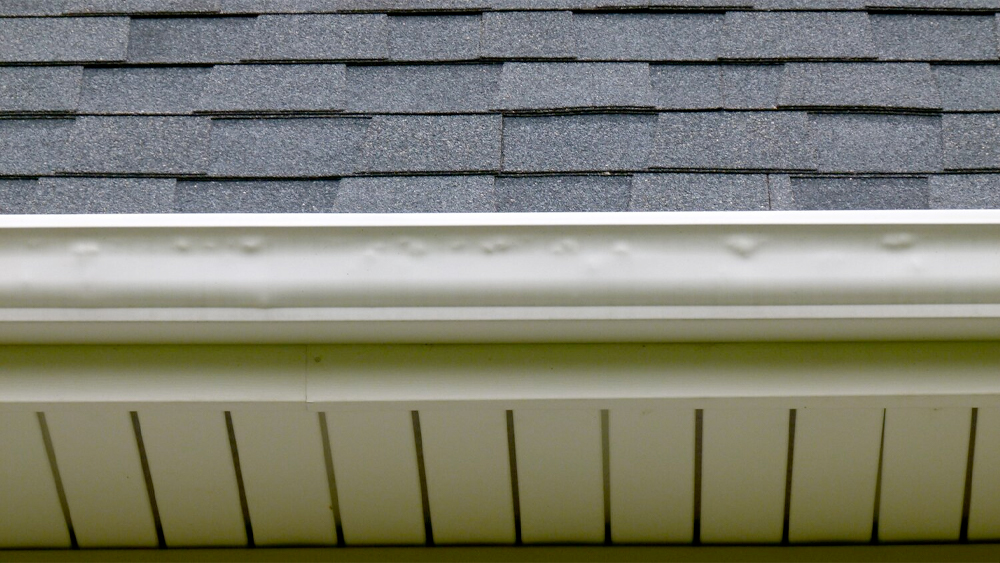
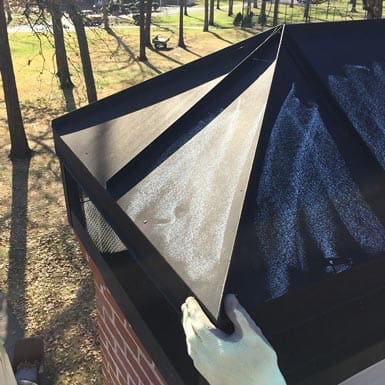
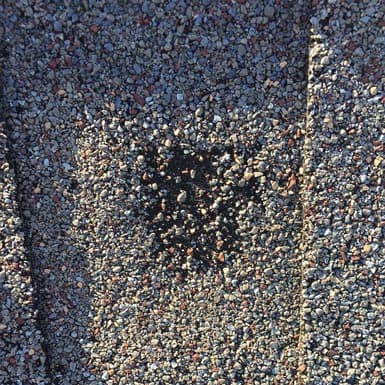
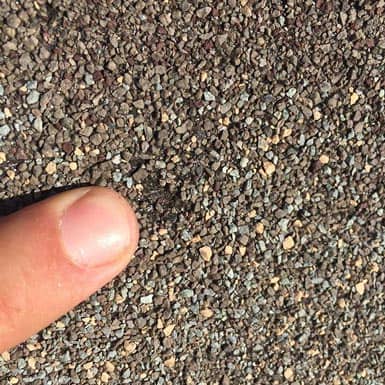
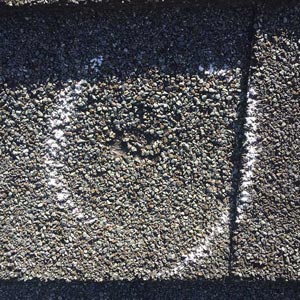
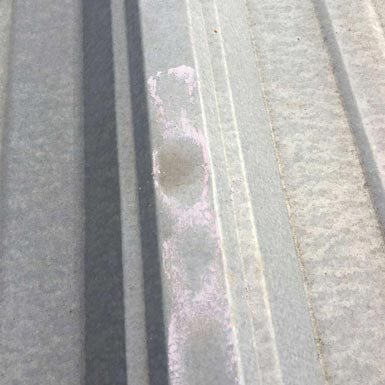
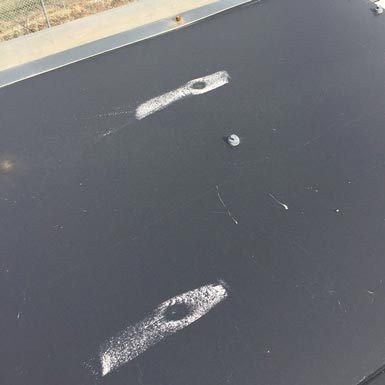
• Wind Damage: Look for missing shingles, fallen debris, or structural cracks.

• Fire Damage: Identify areas affected by heat, smoke, or embers that may compromise your roof and home’s safety.

Not sure what to look for? Let a professional handle it. A comprehensive inspection ensures nothing is overlooked, giving you a full picture of what needs to be repaired.

Step 2: Navigate Insurance Claims

Dealing with insurance after a disaster is overwhelming. Many homeowners struggle with denials, delays, or low settlements. Our team can help by:

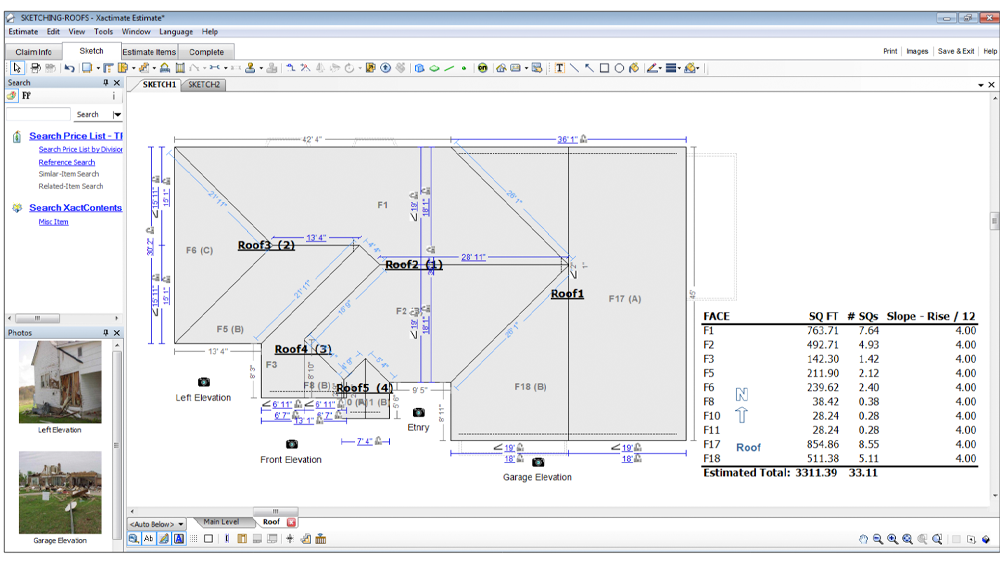
• Documenting all damage with photos and reports.

• Preparing detailed estimates that reflect fair market rates.

• Advocating on your behalf to secure the coverage you deserve.

Step 3: Begin the Rebuilding Process

Rebuilding after a disaster starts with trusted professionals. At All American Construction, we specialize in:

• Emergency Repairs: Securing your property with temporary fixes to prevent further damage.

• Full Restoration: From fire-damaged roofing to structural repairs, we handle it all.

• Windproofing and Fireproofing: Rebuild with stronger, safer materials to protect against future disasters.

Why Choose All American Construction?

With years of experience helping Los Angeles and Orange County homeowners recover from wildfires and high winds, we know what it takes to restore your property quickly and efficiently. We work directly with insurance companies to minimize stress and ensure you get the compensation you need to rebuild.

Take Action Now

Don’t let the chaos of disaster leave you paralyzed. Call All American Construction today for a free inspection and consultation. Or CONTACT US for any question. Together, we’ll assess your needs, handle your insurance, and start rebuilding your home—stronger than ever.

We’re Here to Help

Stay Safe: Protect Your Home and Loved Ones. Prepare now for changing conditions—secure your property and stay informed. We’re here to help every step of the way.”

Get Your Consultation

Filed Under: Uncategorized

Home affected by storm damage? Here’s what to know about your claims adjuster

April 26, 2021 by AAC-USofA 16 Comments

In the aftermath of a natural disaster, many people are so traumatized from the event that they totally tune out when a claims adjuster shows up. But it’s important that you be as engaged as possible. Your complete recovery — financial and emotional — depends on it. This guide will help you remain focussed and calm so that you can recover your investment (your property) efficiently.

1. Self Adjust (Do your own investigating)

Prior to the claims adjuster arriving at your property —do your own investigation and meticulously record damages as you investigate your property. Don’t forget to check your air conditioner, windows, trim, siding and any dormant appliances.

Create your own ledger of things you remember, it’s best to photograph or make a video of your items. Not only will itemizing your possessions give you a good idea of what’s in your home, but it will give you leverage throughout the insurance process. Here’s a good idea of what you need to record:

  • Description of the item
  • Date of purchase
  • Estimate of repair or replacement

Tip: Do not clean up any damaged property until the adjuster sees it. If it is necessary, then photograph or create a video.

There are two kinds of claims adjusters

In the event of a catastrophic storm, it is common for public adjusters — likely independent adjusters — to contact you. This is especially true when there was significant damage in your area or even other parts of the US. But you never know, a staff adjuster who works directly for the insurance company may show up at your door(they usually wear a polo shirt with your insurance company’s logo on it).

The good thing about public adjusters, is that they typically won’t be looking out for the interests of the insurance company compared to a staff adjuster who represents his or her insurance company.

If you go with the staff claims adjuster sent by the insurance company, it is fairly common to challenge their findings, so don’t lose any sleep over this. Also, you can hire a roofer to represent you at the adjuster meeting.

Tip: Before the adjuster arrives, some insurers may send you a proof of loss form to fill out. Don’t lose this form! It will be crucial for you to itemize your losses.

Read the loss notice

The loss notice is one of the most important documents, it is the starting point of all claims investigations. It shows vital information that will allow the adjuster to properly prepare to fulfill the obligations imposed by the Fair Claims Settlement Practices Statute and Fair Claim Settlement Practices Regulations in the adjusters state.

  • Where the loss occurred
  • When the loss occurred
  • The type of coverage the insured has
  • The type of loss
  • The insured’s name, address, and telephone number
  • The agent’s name and address
  • Who to contact and how to contact him or her
  • Whether there is anything to which the adjuster should give special attention
  • Who to contact and how to contact him or her

Read the Policy

Not only is it important for the adjuster to understand the terms and conditions of the agreement between you and the insurer, you should also read and analyze the policy in a logical and thorough manner.

Before beginning to investigate a claim, you must first establish or confirm coverage. To do this, get a complete copy of the insurance policy from your company.

Once the policy is in hand, you can determine the policy limitations and determine the perils insured against. For example, is the policy a standard hail and wind policy, a multiple named peril policy, an old “all risk,” or a direct risk of physical loss policy?

It is important to be familiar with each of the exclusions, limitations, or exceptions from coverage.

claims adjuster

Meet with the adjuster and roofer

Once your adjuster has completed the basic preparation of reviewing the loss notice and the policy wording, he or she should make immediate contact with you (not more than 24 hours after receipt of the loss notice) and arrange to meet with you and a witness (your roofer). The adjuster should explain to you that the policy requires you to prove your loss to the insurer.

In order to provide you with the best service possible and to act in good faith, the insurer hires the adjusters to help you prove your loss.

The adjuster cannot prove the loss for the insured—he or she is only present to help you.

Every adjuster has their own method of investigation and it is best to let them do their thing, simply walk with them where ever they go and watch what they do. If you feel he missed something, simply mention it to him. For example, if your cedar fence shows marks from hail, and he missed it, point it out to him. Also, it’s best to have your roofer with you so that their are three sets of eyes. It is important for everyone to be on the same page before the adjuster leaves your property although nothing is set in stone.

If you have any further questions about coverage, the adjuster should explain to you the obligation for you to provide a sworn statement in proof of loss within 60 days of the loss or within 60 days of the request for a proof of loss, explaining at the same time that if additional time is required, the adjuster and the insurer, whom he or she represents, will grant any reasonable extension of time you need.

The Examination under Oath (EUO)

The 1991 edition of the homeowners policy provides, in easy-to-read language, the following.

2. Your Duties After Loss. In case of a loss to covered property, you must see that the following are done:

f. As often as we reasonably require:

(1) Show the damage property.

(2) Provide us with records and documents we request and permit us to make copies; and

(3) Submit to EUO, while not in the presence of any other “insured” and sign the same. Insurance Services Office, Inc., form HO 00 03 04 91, Page 9 of 10

Although the EUO is a formal proceeding, it is not part of a judicial process. The EUO is not controlled by the rules of civil procedure. In most states, it is considered a condition precedent to recovery under a policy of insurance. The EUO is not limited by any statute relating to civil discovery. Some states have enacted regulations that try to limit insurers taking of the EUO and place certain requirements upon the insurer to chill the desire to take an EUO.

The EUO Should Be Required by an Insurer Only If

In the following situations, the EUO should be required by the insurer.

  • When the insured has insufficient documentary evidence to prove his loss
  • When the insured refuses to cooperate in the investigation of the insurer
  • When the insured is unable to present documentary evidence in support of his or her claim
  • When the insured needs help proving his or her loss
  • When the insurer has no other means of “cross-examining” the proof of loss submitted by the insured
  • When the insurer witnesses a fraudulent claim is being attempted

Obtain the Proof of Loss

When seeking to recover on an insurance policy, you have the burden of proving a loss from causes within the terms of the policy and if such proof of loss is made within the contract of insurance, and the burden is on the insurer to establish that the loss arose from a cause that is excepted from the policy.

The main purpose of a proof of loss “is to familiarize the insurance company with certain facts and circumstances relative to the loss, forming a basis for further steps to be taken by the company, ranging from full settlement to absolute repudiation of liability.

A proof of loss is the sworn statement of you required by the conditions of the policy of insurance. It sets forth your knowledge and belief as to the date, time, and cause of the loss; the encumbrances on the property; the persons with an interest in the property; the value of the property; the amount of loss; and the amount of claim.

Establish the Amount of the Loss and Claim

The adjuster must on the first visit establish with the insured the exact scope of loss. This means that the adjuster and the insured (or PA) must perform a walk through of your house or business and agree to exactly what was damaged and destroyed as a result of the peril insured against.

The scope of loss must be detailed. Descriptions, including room dimensions; materials like cedar fencing, shingles, flashing, and fixtures; and information about special features, openings, casements, detailing, moldings, and other architectural features must be part of the scope of loss. The scope of loss must be complete.

The adjuster must never do the following.

  • Take a quick look around and ask the insured to fill out a property loss form at his or her convenience.
  • Leave the insured with blank forms, except for supplemental items learned of after the initial scope was completed.
  • Take a partial scope, and attempt to do the rest later.
  • Rely on the expertise of the insured’s PA.
  • Rely on a contractor to establish the scope.

The adjuster must walk through the entire scene of the loss with you and obtain an agreed scope of loss. They will advise you to find experts who will bid on the repair and replacement from the agreed scope, but you can hire whom ever you want. The adjuster must then leave you with a copy of the agreed scope and inform you, if you wish, to obtain similar opinions based on the same agreed scope.

Photograph the Scene

To substantiate the agreed scope of the loss, the adjuster must photograph the scene—both the damaged and undamaged portions of the property—that is the subject of the loss. The adjuster must take a complete photographic and written inventory of the loss scene, taking photographs of everything damaged.

If the damage is extensive, you can do your own video inventory of your loss. It should be taken silently. A narration can be added later after everything has been seen. Also, the adjuster must inventory and price each item of inventory, whether damaged or not.

Determine Values

You should give any photographs or video showing loss to help determine the actual cash value of all the property insured.

If a replacement cost value endorsement applies, the adjuster also must determine the full cost to repair or replace the items with like kind and quality. If necessary to establish values, you should provide estimates from the contractors you hire.

Write the Captioned Report

Once agreement is reached with you, the adjuster must write a full captioned report to the file and present it to his or her supervisor for approval.

The adjuster is the representative at the loss scene. He or she must report in writing to superiors with the authority to pay the indemnity required unless the claim falls within the authority provided to the adjuster, who will only then write a short closing report.

They should give you a clear, concise, understandable, and comprehensive report.

The captioned report should be written immediately after the adjuster’s first meeting with you on every file, no matter how small. The length and detail of the report should only be limited by the extent of the loss.

The captioned report is written to explain to the adjuster’s supervisor all the adjuster knows about the loss so that decisions required of them by the insurer and the law can be made. It should be supplemented and updated until an agreement is reached with you or a decision is made to reject the claim.

It should include no less than the following captions providing full information on each issue.

  • Insurance
  • Insured
  • Origin
  • Potential fraud
  • Experts that the adjuster has retained
  • Meetings with officials from authorized government agencies
  • Risk
  • Adjustment
  • Title and encumbrances
  • Policy violations
  • Subrogation and salvage
  • Coverage question if needed
  • Recommendations if necessary
  • Replacement cost agreement

Once the final captioned report is approved by management, the amount of loss can be agreed to and payment issued promptly but, in no event, more than 30 days after the agreement is reached.

https://cdn.wisepops.com/shared/images/wisepops/235462/9c13ccce57dcce93a676663a7aa2107f.gif

Talk with one of our resource experts and see any product before you move forward!

GET YOUR FREE CONSULTATION

Filed Under: Uncategorized

Scared to look at your roof after the hail storm? Here’s what to look for.

April 26, 2021 by AAC-USofA 618 Comments

Hail storm 101

If you’re reading this article, there is a good chance you experienced your first hail storm. This guide was created to help you identify hail damage like a pro. But first you have to understand what hail is.

hail storm

What is hail? Hail is a form of precipitation consisting of solid ice that forms inside thunderstorm updrafts. Hail can damage aircraft, homes and cars, and can be deadly to livestock and people.

How does hail form? Hailstones are formed when raindrops are carried upward by thunderstorm updrafts into extremely cold areas of the atmosphere and freeze. Hailstones then grow by colliding with liquid water drops that freeze onto the hailstone’s surface.

If the water freezes instantaneously when colliding with the hailstone, cloudy ice will form as air bubbles will be trapped in the newly formed ice. However, if the water freezes slowly, the air bubbles can escape and the new ice will be clear.

The hail falls when the thunderstorm’s updraft can no longer support the weight of the hailstone, which can occur if the stone becomes large enough or the updraft weakens.

Hailstones can have layers of clear and cloudy ice if the hailstone encounters different temperature and liquid water content conditions in the thunderstorm. The conditions experienced by the hailstone can change as it passes horizontally across or near an updraft. The layers, however, do not occur simply due to the hailstone going through up and down cycles inside a thunderstorm.

The winds inside a thunderstorm aren’t simply up and down; horizontal winds exist from either a rotating updraft, like in supercell thunderstorms, or from the surrounding environment’s horizontal winds.

Hailstones also do not grow from being lofted to the top of the thunderstorm. At very high altitudes, the air is cold enough (below -40°F) that all liquid water will have frozen into ice, and hailstones need liquid water to grow to an appreciable size.

How does hail fall to the ground? Hail falls when it becomes heavy enough to overcome the strength of the thunderstorm updraft and is pulled toward the earth by gravity. Smaller hailstones can be blown away from the updraft by horizontal winds, so larger hail typically falls closer to the updraft than smaller hail. If the winds near the surface are strong enough, hail can fall at an angle or even nearly sideways!

Wind-driven hail can tear up siding on houses, break windows and blow into houses, break side windows on cars, and cause severe injury and/or death to people and animals. How fast does hail fall? This is a very complicated answer.

The fall speed of hail primarily depends on the size of the hailstone, the friction between the hailstone and surrounding air, the local wind conditions (both horizontal and vertical), and the degree of melting of the hailstone.

Early research assumed that hailstones fell like solid ice spheres and showed very high fall speeds, even for very small hailstones. However, recent research outside of NSSL using 3-D printed casts of real hailstones suspended in a vertical wind tunnel has repeatedly shown that natural hailstones fall more slowly than solid ice spheres.

For small hailstones (<1-inch in diameter), the expected fall speed is between 9 and 25 mph. For hailstones that one would typically see in a severe thunderstorm (1-inch to 1.75-inch in diameter), the expected fall speed is between 25 and 40 mph.

In the strongest supercells that produce some of the largest hail one might expect to see (2-inches to 4-inches in diameter), the expected fall speed is between 44 and 72 mph. However, there is much uncertainty in these estimates due to variability in the hailstone’s shape, degree of melting, fall orientation, and the environmental conditions.

However, it is possible for very large hailstones (diameters exceeding 4-inches) to fall at over 100 mph. What areas have the most hail?

Although Florida has the most thunderstorms, Nebraska, Colorado, and Wyoming usually have the most hailstorms. The area where these three states meet – “hail alley” – averages seven to nine hail days per year.

Other parts of the world that have damaging hailstorms include China, Russia, India and northern Italy.

When viewed from the air, it is evident that hail falls in paths known as hail swaths. These occur as storms move while the hail is falling out They can range in size from a few acres to an area 10 miles wide and 100 miles long. Some storms, instead of producing large hail, instead produce copious amounts of small hail.

Storms like these have produced hail drifts that, when captured in clogged drainage channels, formed piles of hail several feet deep. Hail that completely covers roadways is especially hazardous because if deep enough, a vehicle’s tires may not touch the roadway at all, with the vehicle instead driving on the hail, which acts exactly like an icy roadway in the winter.

How large can hail get? The largest hailstone recovered in the United States fell in Vivian, South Dakota, on June 23, 2010, with a diameter of 8 inches and a circumference of 18.62 inches. It weighed 1 lb 15 oz.

Estimating hail size is often estimated by comparing it to a known object.

Most hailstorms are made up of a mix of different sizes, and only the very largest hail stones pose serious risk to people caught in the open. When reporting hail, estimates comparing the hail to a known object with definite size are good, but measurements using a ruler, calipers, or a tape measure are best.

  • Pea = 1/4 inch diameter
  • Mothball = 1/2 inch diameter
  • Penny = 3/4 inch diameter
  • Nickel = 7/8 inch
  • Quarter = 1 inch — hail quarter size or larger is considered severe
  • Ping-Pong Ball = 1 1/2 inch
  • Golf Ball = 1 3/4 inches
  • Tennis Ball = 2 1/2 inches
  • Baseball = 2 3/4 inches
  • Tea cup = 3 inches
  • Softball = 4 inches
  • Grapefruit = 4 1/2 inches

What we do: All American Construction collects reports from the public about hail and other weather phenomena in the vicinity.

This data is then shared via email with all our clients and subscribers, for free.

Sign up for free weather alerts today and learn how to keep your pets safe during a hail storm

hail storm

Filed Under: Uncategorized

Getting Lowballed? Insurance Claim Scope of Loss Uncovered

April 23, 2021 by AAC-USofA 15 Comments

WHAT IS AN INSURANCE CLAIM SCOPE OF LOSS?

An insurance claim scope of loss is a detailed description of the amount and type of damage that has been done to a structure; it includes the quantity and quality of materials and the current cost of those materials and labor that will be needed to repair that structure.

A scope of loss is typically more detailed than an estimate. A clear and complete insurance claim scope of loss helps a property owner get a fair, full and prompt insurance claim settlement and resist “lowballing”.

A scope of loss often includes photos, diagrams, and a detailed line item broken down by construction trades and materials. A complete scope of loss will specify the work that needs to be done to comply with the local building codes in the area.

insurance claim scope

DESCRIBING PRE-LOSS PROPERTY

Most insurance companies value a loss and make a settlement offer by preparing an estimate or a scope of loss. Usually the insurance company’s will send their own adjuster or a public adjuster to inspect the property and interview you. Insurance companies generally base their claim settlement offers on estimates or scopes of loss.

You – the insured – can prepare or hire a claim or construction professional to prepare your own scope, and then see how it measures up against the insurance company’s scope.

Nowadays, most adjusters use Xactimate to prepare their scopes, estimates and settlement offers.

Sometimes referred to as Scope of Repairs or Repair Scope, a Scope of Work is a document or multiple documents that describe structural damage for a Xactimate estimate.

It will detail what’s needed to repair the damages.

In short, a Scope of Work details the various types of work needed for a project.

On average, a Scope of Work will include:

  • A floor plan or the dimensions of the damaged structure
  • Photos of damages
  • A description of the damage
  • The number of damaged items
  • A list of repair tasks
  • An estimate of labor hours needed for repairs

The point of creating a Scope of Work and submitting it is to have it converted into an estimate.

This is so that you can gauge what the total cost will be for the project.

WHY IS SCOPE OF LOSS SO IMPORTANT?

After investigating your property, your insurance company will make a settlement offer for repairing your home. They will base this offer on a scope of loss, estimate, or loss evaluation. A lot of the time the insurance companies scope of loss is incomplete and inaccurate.

The more detail you provide about your pre-loss home, the more accurate that offer should be. But lowballing on claims is fairly common, so you need to be pro-active to nail down the true costs of returning your home to its pre-loss condition.

WHAT IS LOWBALLING?

“Lowballing” happens when the insurance company’s offer of what they will pay to repair your home is less than  what it will actually cost you to repair or replace the existing property or items.

You should have a contractor who has enough expertise to evaluate whether the scope of work/materials and the cost assigned to those items in the insurance company’s offer is accurate.  

The best way to know if you’re being “lowballed” by an insurance company is by having a scope of loss prepared by an independent third party such as All American Construction.

Schedule Your Free Consultation

Our project specialist will call you to get the details of your project. They’ll answer all your questions and help you select the products that are right for your project and your budget.

Schedule Now

WHO CAN PREPARE AN INDEPENDENT SCOPE OF LOSS?

An experienced contractor familiar will the insurance claims process, like AAC Construction, can assist you in preparing a scope of loss. Alternatively, you can choose an independent consultant, construction estimator, or a public adjuster to help you prepare a scope of loss, usually for a fee. An independent scope is key to getting a fair insurance settlement.

Advantages of using an independent scope of loss

  1. Helps you negotiate better with the insurance company
  2. Contains a greater level of detail about the scope of work to be performed and its associated costs.
  3. Becomes harder for the insurance company to underpay the claim.
  4. More likely to be formatted similarly to the insurance company’s scope of loss, allowing for “apples to apples” comparison of the work and costs estimated by the insurer and the insured.

QUESTIONS TO ASK BEFORE HIRING A CONTRACTOR TO PREPARE AN INDEPENDENT SCOPE OF LOSS:

1. Have you previously prepared an independent scope of loss?

2. Are you familiar with local construction costs in my area? If so, how?

5. How much will you charge for preparing a scope of loss and what is included?

7. Ask for references and call the references.

8. Clarify the scope of work to be performed and fee(s) charged.

a. Does the scope of work include responding to insurance company questions regarding the scope?

b. If not, how much does the preparer charge to respond to insurance company questions?

c. Is the preparer willing to meet with the adjuster to “defend” his scope against the insurance company’s scope?

9. If the person holds a contractor’s license, check the license status with the Contractors State Licensing Board.

Filed Under: Uncategorized

Wind and Hail Inspection: Inspect your Property like a Pro

March 9, 2021 by AAC-USofA 4 Comments

Hail Damage Anatomy

After a storm you will see many property owners with their ladders extended, walking around their house performing their own hail inspection. Hundreds of them will think that everything is fine since they couldn’t see any obvious damage from the ground, while the roof was actually damaged.

The damage will be obvious if you have experienced a golf ball size or larger hail, but even if the hail was smaller than that – there is a good likelihood that your roof was damaged (it may take 2-4 months to become apparent though). And here’s why:

When hail hits your roof it loosens the granules on your shingles – how much the granules are loosened depends on the size of the hail. The larger sized hail will show granule loss immediately but the smaller sized hail will only loosen the granules. So for smaller sized hail damage the granule loss will be over a graduated period of time depending on how much rain you get.

When it rains, the loosened granules wash off the roof and expose the asphalt in the shingles over a period of time. Since granules protect the asphalt in the shingles, once the granules are gone the asphalt is exposed. Exposed asphalt will make the shingles deteriorate much faster than normal, thus causing roof leaks.

In conclusion, hail damage accelerates the aging process of your shingles taking 5-10 years off the life of your roof. So it’s important to find the damage to your home early on before it causes leaks. Also, if you wait too long, the insurance company will not cover any damage and you will be forced to replace the roof, siding, and/or gutters on your own dime.

Request A Free Inspection Immediately

When your home has been through a big storm, or if you suspect your roof has been damaged by strong winds and hail, call AAC Roofing & Construction just to make sure everything is okay.

We inspect and document your entire property for free to determine whether there are any issues you need to fix right away to prevent further damage.

Request a free inspection now →

In the mean time, do your own hail inspection

Things to look for

  • Dented Gutters, Gutter Screens or Downspouts
  • Damage to siding or windowsills
  • Damage to air conditioning unit
  • Missing or broken shingles
  • granules in your driveway or the bottom of gutter downspouts

If you spot damage in any of those places, there’s a good chance your roof took a few hits, as well. In that case, it’s best to call out a roofing contractor to examine your roof.

ONE – look for dented gutters, gutter screens, or downspouts

TWO – look for damage to siding and windowsills/casings

Look also at any other exposed metal surfaces, like metal fascia on the roof eaves for signs of hail damage impact, even if it looks like a faint ding.

THREE – look for damage to air conditioners or other outdoor items

Air Conditioner Hail Damage

In addition to offering a quick glance sign of further hail damage on the roof, a damaged air conditioner may qualify for insurance replacement.

As a homeowner, it’s equally important to keep a ledger of everything that was damaged on your property. This could be a shed, patio cover, porch, decking, anything that the insurance may cover.

FOUR – look for damage to decks or painted wood surfaces

Decks, fences and other painted or stained surfaces surrounding the home may have sustained hail damage. If you see chipped paint, splinters, or discoloration, it may be the result of hail impact.

Roof Inspection

Hail Damage To Roof Vents And Shingles

Once you’re up on the roof, there’s going to be a few things to look for. Vents, chimneys, sky lights, other features and shingles are on our inspection list.

Hail damage often accompanies wind damage to roofing systems, so you’ll want to look for both.

Check out all the roof vents and features to look for any damage. Look for dents, dings, chipped surfaces, etc.

Roof vent hail damage
Skylight hail damage

For the harder to see impact areas like the chimney covers (below), run your chalk sideways over the surface and it will uncover the hail impact points. For the softer metal vents, the damage will be much more obvious.

Hail Damage To Roof Chimney
https://images.squarespace-cdn.com/content/v1/595cf3072994ca8947944b3f/1586463812103-MGJS2AR67UT3PI1WW6A0/ke17ZwdGBToddI8pDm48kO-nusLtcAdtf47f8bIHOgBZw-zPPgdn4jUwVcJE1ZvWQUxwkmyExglNqGp0IvTJZamWLI2zvYWH8K3-s_4yszcp2ryTI0HqTOaaUohrI8PIRZ5NwDSCpbsZQ0RB-l3w14x_kfU1-FWN1-nxyaZPMPYKMshLAGzx4R3EDFOm1kBS/Cedar-Shake-Roof-Hail-Damage-Located-In-Barrington-Hills-Illinois.jpg

The last, but most important thing to check is the shingles. Hail damage to roof shingles are what buys the roof. You’ll never get a solid insurance claim without shingle damage.

What does hail damage look like on shingles?

Hail damage to roof shingles can be very obvious or very difficult to uncover. It takes a trained eye to spot hail damage to roof shingles.

As you can see on the first image below, the surface granules have been knocked off of the shingle very clearly.

The rest of the pictures make it much harder to notice that the shingle has sustained hail damage.

Hail Damage To Roof Shingle

So what, It’s just a few granules…

You may be surprised at the force it takes knock the surface materials off of a shingle. When this is discovered, the integrity of the shingle has been compromised, and a water leak can develop over time. Even the smallest hail impact on a shingle can lead to a roof leak.

Hail Damage To Roof Shingle

Now it’s your job to determine if there’s enough information here to make an insurance claim. Most insurance companies want to see 8+ hits on the roof within a 10ft x 10ft square on at least 3 sides of the roof.

Mark each hit with chalk so you can accurately determine if there is enough damage to have the homeowner make a claim.

Take pictures of the hail hits to show the homeowner whenever you’re done inspecting the roof. You can also show these pictures to the insurance adjuster whenever they come out for their inspection of the roof.

Now, you should have enough information to determine whether or not the home owner will need a roof replacement.

Metal Roof Hail Damage

Shingles can be tricky when it comes to spotting hail damage, but they’re not the only type of roof out there. You have others like wooden shake, clay, slate and metal roofing.

Wood shingles will split right down the middle after being struck by hail. Clay & slate roofing will have cracks and/or gouges, and metal roofing will have impact dents like we saw on the gutters at the beginning.

Metal roofing is one of the easiest to spot for hail damage.

Here are some examples of hail damage on a metal roof.

Metal Roof Hail Damage

See all hail damage pictures here.

What size hail causes roof damage?

On average, it takes a 1″ or above diameter hail stone to cause damage to common asphalt shingles. When referring to hail sizes, here are a few common objects to compare:

  • Pea  = 1/4-inch in diameter
  • Marble = 1/2-inch in diameter
  • Dime or penny = 3/4-inch in diameter (hail the size of a penny or larger is considered severe)
  • Nickel = 7/8-inch
  • Quarter = 1 inch
  • Golf Ball = 1½  inches
  • Tennis Ball = 2½ inches
  • Baseball = 2¾ inches
  • Tea cup = 3 inches
  • Softball = 4 inches

Several surveys and studies have been completed to show to damage potential of different size hail stones on various types of common roofing materials. Field observations and ice stone impact tests provide some common correlation between stone size and damage potential.

MaterialHailstone Size
3-Tab organic asphalt shingles1″
3-Tab fiberglass asphalt shingles1¼”
Cedar shingles1¼”
Fiber-cement tiles1¼”
Flat concrete tiles1¼”
Heavy cedar shakes1½”
30-year laminated shingles1½”
Built-up gravel roofing2″
S-shaped concrete tiles2″

What does hail damage do to a roof?

The severity of hail damage to a roof depends on several factors, including:

What do I do If I think I have hail damage?

Hard hail impacts or high winds can grip the shingles and cause cracks. This can lead to exposure and tears, leaving your roof with bare spots. Cracked shingles cannot effectively protect your roof from the weather.

Homeowners: It’s very important that you have your contractor come out and inspect the roof with your insurance adjuster. You have to remember the insurance company is looking for reasons NOT to replace your roof. That’s why it’s important to make sure your contractor inspects the roof with the adjuster.

In Summary…

We are experts equipped with the right information and resources, you’ll have a trained eye on your side to spot hail damage. If you are a homeowner or commercial company, we can help you get fair coverage for the losses you’ve sustained.

If you have been experiencing any leaks in the home that could have resulted from the hail damage to roof shingles. Our job is to assist you and get full and fair settlement for all parts of your property.

Schedule Your Free Consultation

Our project specialist will call you to get the details of your project. They’ll answer all your questions and help you select the products that are right for your project and your budget.

Schedule Now

Filed Under: Uncategorized

Residential Roof Replacement Guide 2021

March 9, 2021 by AAC-USofA 13 Comments

Most asphalt shingle roofs last between 20 and 30 years, while those made from tile, metal or slate usually have a longer lifespan.

The whole roofing system works together, including shingles, underlayment, the deck, vents and other parts, to protect your home from the elements – over time, the structure gives out.

While you can make repairs along the way, it’s eventually going to be time for roof replacement.

Residential Roof Replacement and How it Works

If you think your home may need a residential roof replacement anywhere in the USA, your first step should be to request a free roof inspection from one of the area’s expert roofing companies – ACC Roofing & Construction.

Our skilled, professional roofers will schedule a time that works for you to come out and inspect every inch of your roof.

We’ll bring any issues to your attention and make recommendations for repairs or roof replacement. We’ll also provide you with an on-the-spot estimate so you can make the most informed decision possible.

When you’re ready to move forward, we’ll talk to you about timelines. Our goal is to minimize disruption to your schedule while working quickly and efficiently.

We’ll remove your existing roof and replace it with the materials you choose – and if you’re not sure what materials will be best, we can help. Our experts understand that the roofing materials you choose can impact your home’s value, and we’ll discuss your budget and your needs to make sure you’re able to make an informed decision.

How Do You Know if You Need Roof Replacement?

One of the biggest signs that you need a new roof is age. When neighbors start to replace their roofs, you should have yours inspected to find out how much longer it’s likely to last or whether you need roof replacement right away. There are other signs you need roof replacement, too, including:

  • High heating and cooling costs
  • Leaks, even if you can’t see them
  • Missing shingles
  • Cracked or damaged shingles
  • Broken or damaged flashing
  • Algae or moss growing on your roof
  • Water damage inside your home
  • You see ice dams in winter

Each of these signs is worth investigating. You may just need simple roof repairs – and if you do, our roofing team will recommend all the right fixes. If you end up needing a roof replacement, we’ll discuss your needs, your roofing materials options (such as asphalt shingles, tile or slate shingles, metal roofing or another type) and how much the replacement is likely to cost.

The Replacement Process

1. Materials will get delivered to your home 

The first step to your roof replacement is getting all the roofing materials delivered to your home. The material will be placed directly on your roof to keep it safe from thieves and to help your roofer. However, there are instances where the material is placed elsewhere depending on the size of your roof and access.

2. Moving your vehicles out of the way 

When your contractor arrives at your home they’ll make sure all the vehicles are moved out of your driveway or garage. If the vehicle in the garage won’t be used during your replacement then it’s not necessary to move. 

We don’t want to block you or your family from going about your business as usual, but it is best to park your vehicles on the street to avoid any stray debris such as nails or metal flashing. 

3. Setting up protection for your property

The next step of your roof replacement is preparing your property for the roof tear off. For example, they’ll start tarping the ground for the dump zone and set up tarps to cover your shrubbery and landscaping. 

This is where your contractor takes all the necessary steps to ensure they protect your property during your roof replacement. It’s also a good idea for you to protect things on the inside, such as pictures on the wall, and any breakable items that could fall over.

4. Your old roof will be torn off

After your contractor covers everything, they’ll begin tearing off your old roof in sections. They’ll start on the furthest corner of your roof away from your driveway so that they’re always moving towards the dump trailer and new materials. 

After a section is torn off, some installers will stay behind to begin installing your new roof while the others continue tearing off. This saves time and means less traffic on your roof.  

5. Your gutters will be cleaned out

As soon as a section is torn off and cleaned up, your gutters will be cleaned out as well unless they are being replaced.

6. Install begins  

After the tear-off we start to install your roofing material. We’ll systematically work our way around the house following the sections that are torn off.

Once a section is torn off, we’ll lay synthetic felt (underlayment) and install the drip edge. Then we will start the installation of your choosing.

When they’re done with the roof material, we’ll start on all the ridge capping, and vents.

7. Cleaning up after the replacement  

After your new roof has been installed, your contractor is ready to begin the cleanup process. They’ll blow off your roof so that all the leftover debris gets down on the dump tarps.

They’ll also blow out your gutters and downspouts to clear them of any roofing debris. After they get off your roof, they’ll spend a couple of hours on the ground. 

This is when they’ll roll up all the tarps, get their tools, and make sure everything on the ground is cleaned up. To ensure they get all the nails, they’ll go all over your property with a strong magnet. After they leave, it should be like they weren’t there at all. 

8. Inspecting their workmanship

After your roof has been replaced and your property has been cleaned up, we will double-check the finished product. We’ll get on your roof, take a look around, and make sure the quality of the roof matches the high standards you expect when investing in a roof replacement. 

They’ll double-check the areas that are known to leak frequently (around penetrations, skylights, chimneys, etc.) and make sure they’re properly protected. No matter the contractor you hire, they should always inspect their workmanship to ensure your roof was properly installed and all local codes have been followed. 

The job is never finished until you say so

Schedule Your Free Consultation

Our project specialist will call you to get the details of your project. They’ll answer all your questions and help you select the products that are right for your project and your budget.

Schedule Now

Filed Under: Uncategorized

  • Page 1
  • Page 2
  • Go to Next Page »

Primary Sidebar

Updates, News, and Free Storm Tracker Via Email

Follow Us

Recent Posts

  • Rebuilding Lives After Wildfires and Winds in LA and Orange County
  • Home affected by storm damage? Here’s what to know about your claims adjuster
  • Scared to look at your roof after the hail storm? Here’s what to look for.
  • Getting Lowballed? Insurance Claim Scope of Loss Uncovered
  • Wind and Hail Inspection: Inspect your Property like a Pro

Recent Comments

  • Jorgedes on Scared to look at your roof after the hail storm? Here’s what to look for.
  • Josephpug on Scared to look at your roof after the hail storm? Here’s what to look for.
  • Jorgedes on Scared to look at your roof after the hail storm? Here’s what to look for.
  • KennethNeone on Scared to look at your roof after the hail storm? Here’s what to look for.
  • GictorClota on Scared to look at your roof after the hail storm? Here’s what to look for.

Archives

  • January 2025
  • April 2021
  • March 2021

Categories

  • Uncategorized

Meta

  • Log in
  • Entries feed
  • Comments feed
  • WordPress.org

Footer

Contact Information

All American Construction
317 S. Beachwood Dr.
Burbank, CA 91506
Email: solutions@coreypate.com
Dial: 818-403-3631


Follow us

Other Services

Emergency Roof Repair
Siding
Gutters
Windows
Painting

Insurance Claims


Service Areas

Los Angeles CA.
Orange County CA.
Colorado Springs – CO.

Copyright © 2025 All American Construction