• Skip to primary navigation
  • Skip to main content
  • Skip to primary sidebar
  • Skip to footer
All American Construction

All American Construction

Strong Roofs, Fair Settlements—Serving LA & Orange County.

  • About Us
  • Roof Services
    • Storm Restoration, Simplified
    • Insurance Claim
    • Emergency Roof Repair near me: Local Experts
    • Gutters
    • Siding
    • Window replacement
    • Residential & Commercial Painting
  • Commercial Roofing
    • EPDM
    • Fluid Applied Systems
    • Commercial Green Roofs
    • Commercial Metal Roofing
    • Modified Bitumen & Built-up Roofing
    • Roof Coatings
    • Steep Slope
    • Thermoplastic Membranes
    • Preventative Maintenance
  • Residential Roofing
    • Asphalt Shingles
    • Metal Roofing
    • Clay Tile
    • Cedar Roofs
    • Slate Roofs
    • Synthetic Roofs
  • Contact Us

AAC-USofA

Home affected by storm damage? Here’s what to know about your claims adjuster

April 26, 2021 by AAC-USofA 16 Comments

In the aftermath of a natural disaster, many people are so traumatized from the event that they totally tune out when a claims adjuster shows up. But it’s important that you be as engaged as possible. Your complete recovery — financial and emotional — depends on it. This guide will help you remain focussed and calm so that you can recover your investment (your property) efficiently.

1. Self Adjust (Do your own investigating)

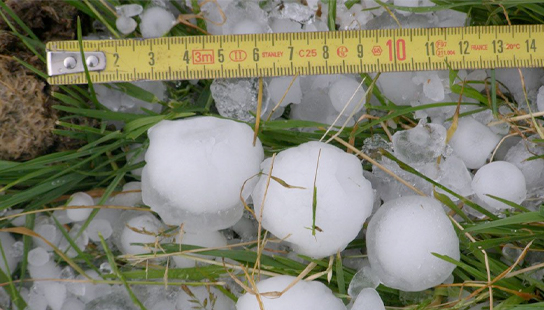
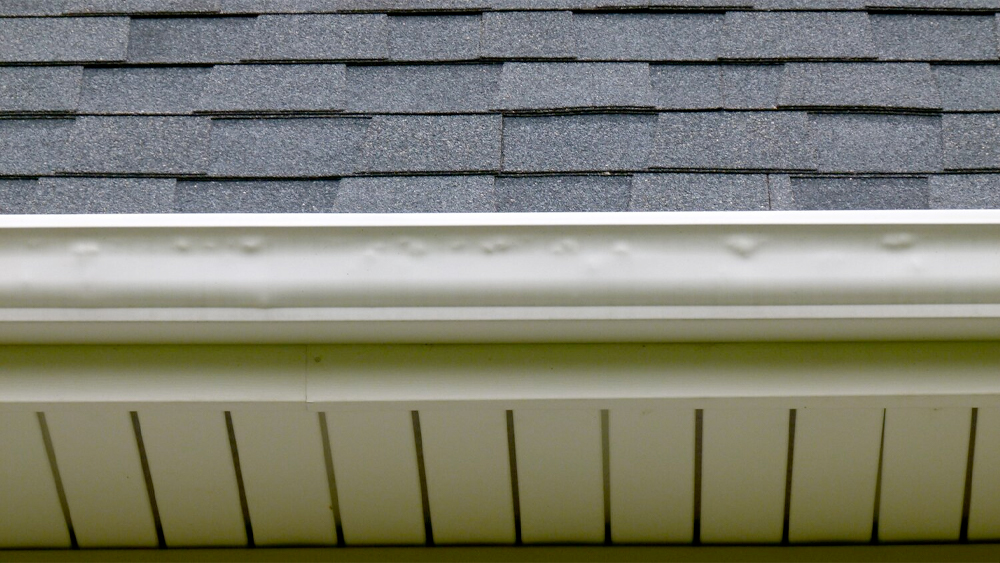
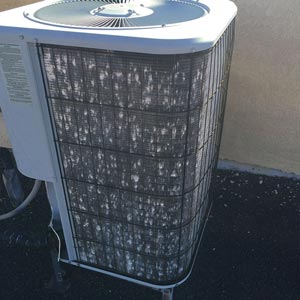
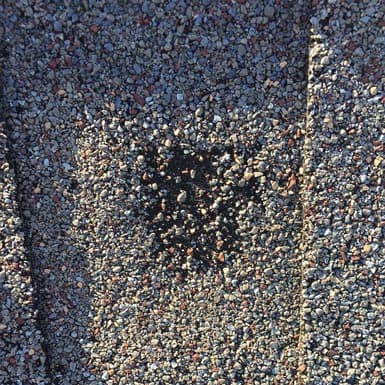
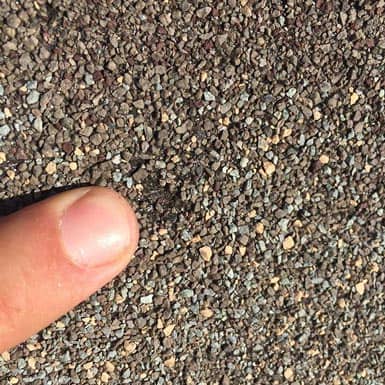
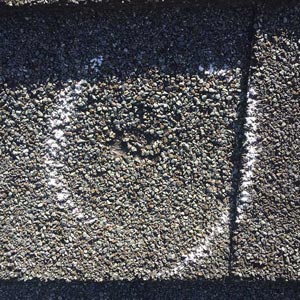
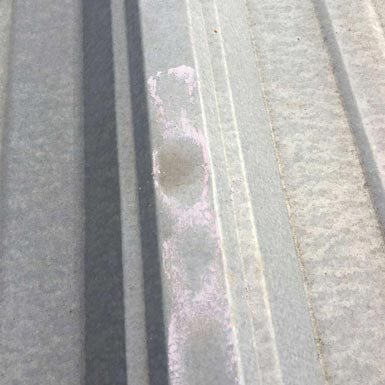
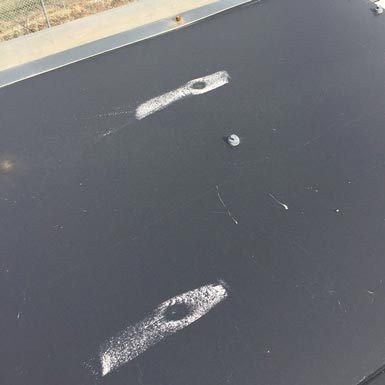
Prior to the claims adjuster arriving at your property —do your own investigation and meticulously record damages as you investigate your property. Don’t forget to check your air conditioner, windows, trim, siding and any dormant appliances.

Create your own ledger of things you remember, it’s best to photograph or make a video of your items. Not only will itemizing your possessions give you a good idea of what’s in your home, but it will give you leverage throughout the insurance process. Here’s a good idea of what you need to record:

  • Description of the item
  • Date of purchase
  • Estimate of repair or replacement

Tip: Do not clean up any damaged property until the adjuster sees it. If it is necessary, then photograph or create a video.

There are two kinds of claims adjusters

In the event of a catastrophic storm, it is common for public adjusters — likely independent adjusters — to contact you. This is especially true when there was significant damage in your area or even other parts of the US. But you never know, a staff adjuster who works directly for the insurance company may show up at your door(they usually wear a polo shirt with your insurance company’s logo on it).

The good thing about public adjusters, is that they typically won’t be looking out for the interests of the insurance company compared to a staff adjuster who represents his or her insurance company.

If you go with the staff claims adjuster sent by the insurance company, it is fairly common to challenge their findings, so don’t lose any sleep over this. Also, you can hire a roofer to represent you at the adjuster meeting.

Tip: Before the adjuster arrives, some insurers may send you a proof of loss form to fill out. Don’t lose this form! It will be crucial for you to itemize your losses.

Read the loss notice

The loss notice is one of the most important documents, it is the starting point of all claims investigations. It shows vital information that will allow the adjuster to properly prepare to fulfill the obligations imposed by the Fair Claims Settlement Practices Statute and Fair Claim Settlement Practices Regulations in the adjusters state.

  • Where the loss occurred
  • When the loss occurred
  • The type of coverage the insured has
  • The type of loss
  • The insured’s name, address, and telephone number
  • The agent’s name and address
  • Who to contact and how to contact him or her
  • Whether there is anything to which the adjuster should give special attention
  • Who to contact and how to contact him or her

Read the Policy

Not only is it important for the adjuster to understand the terms and conditions of the agreement between you and the insurer, you should also read and analyze the policy in a logical and thorough manner.

Before beginning to investigate a claim, you must first establish or confirm coverage. To do this, get a complete copy of the insurance policy from your company.

Once the policy is in hand, you can determine the policy limitations and determine the perils insured against. For example, is the policy a standard hail and wind policy, a multiple named peril policy, an old “all risk,” or a direct risk of physical loss policy?

It is important to be familiar with each of the exclusions, limitations, or exceptions from coverage.

claims adjuster

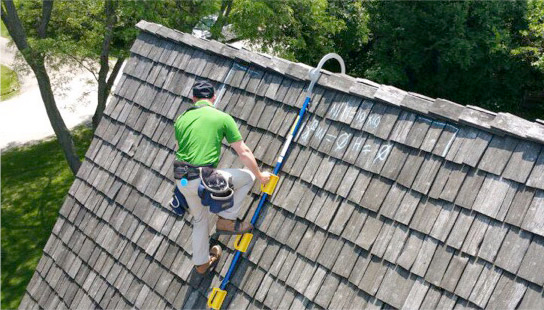
Meet with the adjuster and roofer

Once your adjuster has completed the basic preparation of reviewing the loss notice and the policy wording, he or she should make immediate contact with you (not more than 24 hours after receipt of the loss notice) and arrange to meet with you and a witness (your roofer). The adjuster should explain to you that the policy requires you to prove your loss to the insurer.

In order to provide you with the best service possible and to act in good faith, the insurer hires the adjusters to help you prove your loss.

The adjuster cannot prove the loss for the insured—he or she is only present to help you.

Every adjuster has their own method of investigation and it is best to let them do their thing, simply walk with them where ever they go and watch what they do. If you feel he missed something, simply mention it to him. For example, if your cedar fence shows marks from hail, and he missed it, point it out to him. Also, it’s best to have your roofer with you so that their are three sets of eyes. It is important for everyone to be on the same page before the adjuster leaves your property although nothing is set in stone.

If you have any further questions about coverage, the adjuster should explain to you the obligation for you to provide a sworn statement in proof of loss within 60 days of the loss or within 60 days of the request for a proof of loss, explaining at the same time that if additional time is required, the adjuster and the insurer, whom he or she represents, will grant any reasonable extension of time you need.

The Examination under Oath (EUO)

The 1991 edition of the homeowners policy provides, in easy-to-read language, the following.

2. Your Duties After Loss. In case of a loss to covered property, you must see that the following are done:

f. As often as we reasonably require:

(1) Show the damage property.

(2) Provide us with records and documents we request and permit us to make copies; and

(3) Submit to EUO, while not in the presence of any other “insured” and sign the same. Insurance Services Office, Inc., form HO 00 03 04 91, Page 9 of 10

Although the EUO is a formal proceeding, it is not part of a judicial process. The EUO is not controlled by the rules of civil procedure. In most states, it is considered a condition precedent to recovery under a policy of insurance. The EUO is not limited by any statute relating to civil discovery. Some states have enacted regulations that try to limit insurers taking of the EUO and place certain requirements upon the insurer to chill the desire to take an EUO.

The EUO Should Be Required by an Insurer Only If

In the following situations, the EUO should be required by the insurer.

  • When the insured has insufficient documentary evidence to prove his loss
  • When the insured refuses to cooperate in the investigation of the insurer
  • When the insured is unable to present documentary evidence in support of his or her claim
  • When the insured needs help proving his or her loss
  • When the insurer has no other means of “cross-examining” the proof of loss submitted by the insured
  • When the insurer witnesses a fraudulent claim is being attempted

Obtain the Proof of Loss

When seeking to recover on an insurance policy, you have the burden of proving a loss from causes within the terms of the policy and if such proof of loss is made within the contract of insurance, and the burden is on the insurer to establish that the loss arose from a cause that is excepted from the policy.

The main purpose of a proof of loss “is to familiarize the insurance company with certain facts and circumstances relative to the loss, forming a basis for further steps to be taken by the company, ranging from full settlement to absolute repudiation of liability.

A proof of loss is the sworn statement of you required by the conditions of the policy of insurance. It sets forth your knowledge and belief as to the date, time, and cause of the loss; the encumbrances on the property; the persons with an interest in the property; the value of the property; the amount of loss; and the amount of claim.

Establish the Amount of the Loss and Claim

The adjuster must on the first visit establish with the insured the exact scope of loss. This means that the adjuster and the insured (or PA) must perform a walk through of your house or business and agree to exactly what was damaged and destroyed as a result of the peril insured against.

The scope of loss must be detailed. Descriptions, including room dimensions; materials like cedar fencing, shingles, flashing, and fixtures; and information about special features, openings, casements, detailing, moldings, and other architectural features must be part of the scope of loss. The scope of loss must be complete.

The adjuster must never do the following.

  • Take a quick look around and ask the insured to fill out a property loss form at his or her convenience.
  • Leave the insured with blank forms, except for supplemental items learned of after the initial scope was completed.
  • Take a partial scope, and attempt to do the rest later.
  • Rely on the expertise of the insured’s PA.
  • Rely on a contractor to establish the scope.

The adjuster must walk through the entire scene of the loss with you and obtain an agreed scope of loss. They will advise you to find experts who will bid on the repair and replacement from the agreed scope, but you can hire whom ever you want. The adjuster must then leave you with a copy of the agreed scope and inform you, if you wish, to obtain similar opinions based on the same agreed scope.

Photograph the Scene

To substantiate the agreed scope of the loss, the adjuster must photograph the scene—both the damaged and undamaged portions of the property—that is the subject of the loss. The adjuster must take a complete photographic and written inventory of the loss scene, taking photographs of everything damaged.

If the damage is extensive, you can do your own video inventory of your loss. It should be taken silently. A narration can be added later after everything has been seen. Also, the adjuster must inventory and price each item of inventory, whether damaged or not.

Determine Values

You should give any photographs or video showing loss to help determine the actual cash value of all the property insured.

If a replacement cost value endorsement applies, the adjuster also must determine the full cost to repair or replace the items with like kind and quality. If necessary to establish values, you should provide estimates from the contractors you hire.

Write the Captioned Report

Once agreement is reached with you, the adjuster must write a full captioned report to the file and present it to his or her supervisor for approval.

The adjuster is the representative at the loss scene. He or she must report in writing to superiors with the authority to pay the indemnity required unless the claim falls within the authority provided to the adjuster, who will only then write a short closing report.

They should give you a clear, concise, understandable, and comprehensive report.

The captioned report should be written immediately after the adjuster’s first meeting with you on every file, no matter how small. The length and detail of the report should only be limited by the extent of the loss.

The captioned report is written to explain to the adjuster’s supervisor all the adjuster knows about the loss so that decisions required of them by the insurer and the law can be made. It should be supplemented and updated until an agreement is reached with you or a decision is made to reject the claim.

It should include no less than the following captions providing full information on each issue.

  • Insurance
  • Insured
  • Origin
  • Potential fraud
  • Experts that the adjuster has retained
  • Meetings with officials from authorized government agencies
  • Risk
  • Adjustment
  • Title and encumbrances
  • Policy violations
  • Subrogation and salvage
  • Coverage question if needed
  • Recommendations if necessary
  • Replacement cost agreement

Once the final captioned report is approved by management, the amount of loss can be agreed to and payment issued promptly but, in no event, more than 30 days after the agreement is reached.

https://cdn.wisepops.com/shared/images/wisepops/235462/9c13ccce57dcce93a676663a7aa2107f.gif

Talk with one of our resource experts and see any product before you move forward!

GET YOUR FREE CONSULTATION

Filed Under: Uncategorized

Scared to look at your roof after the hail storm? Here’s what to look for.

April 26, 2021 by AAC-USofA 618 Comments

Hail storm 101

If you’re reading this article, there is a good chance you experienced your first hail storm. This guide was created to help you identify hail damage like a pro. But first you have to understand what hail is.

hail storm

What is hail? Hail is a form of precipitation consisting of solid ice that forms inside thunderstorm updrafts. Hail can damage aircraft, homes and cars, and can be deadly to livestock and people.

How does hail form? Hailstones are formed when raindrops are carried upward by thunderstorm updrafts into extremely cold areas of the atmosphere and freeze. Hailstones then grow by colliding with liquid water drops that freeze onto the hailstone’s surface.

If the water freezes instantaneously when colliding with the hailstone, cloudy ice will form as air bubbles will be trapped in the newly formed ice. However, if the water freezes slowly, the air bubbles can escape and the new ice will be clear.

The hail falls when the thunderstorm’s updraft can no longer support the weight of the hailstone, which can occur if the stone becomes large enough or the updraft weakens.

Hailstones can have layers of clear and cloudy ice if the hailstone encounters different temperature and liquid water content conditions in the thunderstorm. The conditions experienced by the hailstone can change as it passes horizontally across or near an updraft. The layers, however, do not occur simply due to the hailstone going through up and down cycles inside a thunderstorm.

The winds inside a thunderstorm aren’t simply up and down; horizontal winds exist from either a rotating updraft, like in supercell thunderstorms, or from the surrounding environment’s horizontal winds.

Hailstones also do not grow from being lofted to the top of the thunderstorm. At very high altitudes, the air is cold enough (below -40°F) that all liquid water will have frozen into ice, and hailstones need liquid water to grow to an appreciable size.

How does hail fall to the ground? Hail falls when it becomes heavy enough to overcome the strength of the thunderstorm updraft and is pulled toward the earth by gravity. Smaller hailstones can be blown away from the updraft by horizontal winds, so larger hail typically falls closer to the updraft than smaller hail. If the winds near the surface are strong enough, hail can fall at an angle or even nearly sideways!

Wind-driven hail can tear up siding on houses, break windows and blow into houses, break side windows on cars, and cause severe injury and/or death to people and animals. How fast does hail fall? This is a very complicated answer.

The fall speed of hail primarily depends on the size of the hailstone, the friction between the hailstone and surrounding air, the local wind conditions (both horizontal and vertical), and the degree of melting of the hailstone.

Early research assumed that hailstones fell like solid ice spheres and showed very high fall speeds, even for very small hailstones. However, recent research outside of NSSL using 3-D printed casts of real hailstones suspended in a vertical wind tunnel has repeatedly shown that natural hailstones fall more slowly than solid ice spheres.

For small hailstones (<1-inch in diameter), the expected fall speed is between 9 and 25 mph. For hailstones that one would typically see in a severe thunderstorm (1-inch to 1.75-inch in diameter), the expected fall speed is between 25 and 40 mph.

In the strongest supercells that produce some of the largest hail one might expect to see (2-inches to 4-inches in diameter), the expected fall speed is between 44 and 72 mph. However, there is much uncertainty in these estimates due to variability in the hailstone’s shape, degree of melting, fall orientation, and the environmental conditions.

However, it is possible for very large hailstones (diameters exceeding 4-inches) to fall at over 100 mph. What areas have the most hail?

Although Florida has the most thunderstorms, Nebraska, Colorado, and Wyoming usually have the most hailstorms. The area where these three states meet – “hail alley” – averages seven to nine hail days per year.

Other parts of the world that have damaging hailstorms include China, Russia, India and northern Italy.

When viewed from the air, it is evident that hail falls in paths known as hail swaths. These occur as storms move while the hail is falling out They can range in size from a few acres to an area 10 miles wide and 100 miles long. Some storms, instead of producing large hail, instead produce copious amounts of small hail.

Storms like these have produced hail drifts that, when captured in clogged drainage channels, formed piles of hail several feet deep. Hail that completely covers roadways is especially hazardous because if deep enough, a vehicle’s tires may not touch the roadway at all, with the vehicle instead driving on the hail, which acts exactly like an icy roadway in the winter.

How large can hail get? The largest hailstone recovered in the United States fell in Vivian, South Dakota, on June 23, 2010, with a diameter of 8 inches and a circumference of 18.62 inches. It weighed 1 lb 15 oz.

Estimating hail size is often estimated by comparing it to a known object.

Most hailstorms are made up of a mix of different sizes, and only the very largest hail stones pose serious risk to people caught in the open. When reporting hail, estimates comparing the hail to a known object with definite size are good, but measurements using a ruler, calipers, or a tape measure are best.

  • Pea = 1/4 inch diameter
  • Mothball = 1/2 inch diameter
  • Penny = 3/4 inch diameter
  • Nickel = 7/8 inch
  • Quarter = 1 inch — hail quarter size or larger is considered severe
  • Ping-Pong Ball = 1 1/2 inch
  • Golf Ball = 1 3/4 inches
  • Tennis Ball = 2 1/2 inches
  • Baseball = 2 3/4 inches
  • Tea cup = 3 inches
  • Softball = 4 inches
  • Grapefruit = 4 1/2 inches

What we do: All American Construction collects reports from the public about hail and other weather phenomena in the vicinity.

This data is then shared via email with all our clients and subscribers, for free.

Sign up for free weather alerts today and learn how to keep your pets safe during a hail storm

hail storm

Filed Under: Uncategorized

Getting Lowballed? Insurance Claim Scope of Loss Uncovered

April 23, 2021 by AAC-USofA 15 Comments

WHAT IS AN INSURANCE CLAIM SCOPE OF LOSS?

An insurance claim scope of loss is a detailed description of the amount and type of damage that has been done to a structure; it includes the quantity and quality of materials and the current cost of those materials and labor that will be needed to repair that structure.

A scope of loss is typically more detailed than an estimate. A clear and complete insurance claim scope of loss helps a property owner get a fair, full and prompt insurance claim settlement and resist “lowballing”.

A scope of loss often includes photos, diagrams, and a detailed line item broken down by construction trades and materials. A complete scope of loss will specify the work that needs to be done to comply with the local building codes in the area.

insurance claim scope

DESCRIBING PRE-LOSS PROPERTY

Most insurance companies value a loss and make a settlement offer by preparing an estimate or a scope of loss. Usually the insurance company’s will send their own adjuster or a public adjuster to inspect the property and interview you. Insurance companies generally base their claim settlement offers on estimates or scopes of loss.

You – the insured – can prepare or hire a claim or construction professional to prepare your own scope, and then see how it measures up against the insurance company’s scope.

Nowadays, most adjusters use Xactimate to prepare their scopes, estimates and settlement offers.

Sometimes referred to as Scope of Repairs or Repair Scope, a Scope of Work is a document or multiple documents that describe structural damage for a Xactimate estimate.

It will detail what’s needed to repair the damages.

In short, a Scope of Work details the various types of work needed for a project.

On average, a Scope of Work will include:

  • A floor plan or the dimensions of the damaged structure
  • Photos of damages
  • A description of the damage
  • The number of damaged items
  • A list of repair tasks
  • An estimate of labor hours needed for repairs

The point of creating a Scope of Work and submitting it is to have it converted into an estimate.

This is so that you can gauge what the total cost will be for the project.

WHY IS SCOPE OF LOSS SO IMPORTANT?

After investigating your property, your insurance company will make a settlement offer for repairing your home. They will base this offer on a scope of loss, estimate, or loss evaluation. A lot of the time the insurance companies scope of loss is incomplete and inaccurate.

The more detail you provide about your pre-loss home, the more accurate that offer should be. But lowballing on claims is fairly common, so you need to be pro-active to nail down the true costs of returning your home to its pre-loss condition.

WHAT IS LOWBALLING?

“Lowballing” happens when the insurance company’s offer of what they will pay to repair your home is less than  what it will actually cost you to repair or replace the existing property or items.

You should have a contractor who has enough expertise to evaluate whether the scope of work/materials and the cost assigned to those items in the insurance company’s offer is accurate.  

The best way to know if you’re being “lowballed” by an insurance company is by having a scope of loss prepared by an independent third party such as All American Construction.

Schedule Your Free Consultation

Our project specialist will call you to get the details of your project. They’ll answer all your questions and help you select the products that are right for your project and your budget.

Schedule Now

WHO CAN PREPARE AN INDEPENDENT SCOPE OF LOSS?

An experienced contractor familiar will the insurance claims process, like AAC Construction, can assist you in preparing a scope of loss. Alternatively, you can choose an independent consultant, construction estimator, or a public adjuster to help you prepare a scope of loss, usually for a fee. An independent scope is key to getting a fair insurance settlement.

Advantages of using an independent scope of loss

  1. Helps you negotiate better with the insurance company
  2. Contains a greater level of detail about the scope of work to be performed and its associated costs.
  3. Becomes harder for the insurance company to underpay the claim.
  4. More likely to be formatted similarly to the insurance company’s scope of loss, allowing for “apples to apples” comparison of the work and costs estimated by the insurer and the insured.

QUESTIONS TO ASK BEFORE HIRING A CONTRACTOR TO PREPARE AN INDEPENDENT SCOPE OF LOSS:

1. Have you previously prepared an independent scope of loss?

2. Are you familiar with local construction costs in my area? If so, how?

5. How much will you charge for preparing a scope of loss and what is included?

7. Ask for references and call the references.

8. Clarify the scope of work to be performed and fee(s) charged.

a. Does the scope of work include responding to insurance company questions regarding the scope?

b. If not, how much does the preparer charge to respond to insurance company questions?

c. Is the preparer willing to meet with the adjuster to “defend” his scope against the insurance company’s scope?

9. If the person holds a contractor’s license, check the license status with the Contractors State Licensing Board.

Filed Under: Uncategorized

Wind and Hail Inspection: Inspect your Property like a Pro

March 9, 2021 by AAC-USofA 4 Comments

Hail Damage Anatomy

After a storm you will see many property owners with their ladders extended, walking around their house performing their own hail inspection. Hundreds of them will think that everything is fine since they couldn’t see any obvious damage from the ground, while the roof was actually damaged.

The damage will be obvious if you have experienced a golf ball size or larger hail, but even if the hail was smaller than that – there is a good likelihood that your roof was damaged (it may take 2-4 months to become apparent though). And here’s why:

When hail hits your roof it loosens the granules on your shingles – how much the granules are loosened depends on the size of the hail. The larger sized hail will show granule loss immediately but the smaller sized hail will only loosen the granules. So for smaller sized hail damage the granule loss will be over a graduated period of time depending on how much rain you get.

When it rains, the loosened granules wash off the roof and expose the asphalt in the shingles over a period of time. Since granules protect the asphalt in the shingles, once the granules are gone the asphalt is exposed. Exposed asphalt will make the shingles deteriorate much faster than normal, thus causing roof leaks.

In conclusion, hail damage accelerates the aging process of your shingles taking 5-10 years off the life of your roof. So it’s important to find the damage to your home early on before it causes leaks. Also, if you wait too long, the insurance company will not cover any damage and you will be forced to replace the roof, siding, and/or gutters on your own dime.

Request A Free Inspection Immediately

When your home has been through a big storm, or if you suspect your roof has been damaged by strong winds and hail, call AAC Roofing & Construction just to make sure everything is okay.

We inspect and document your entire property for free to determine whether there are any issues you need to fix right away to prevent further damage.

Request a free inspection now →

In the mean time, do your own hail inspection

Things to look for

  • Dented Gutters, Gutter Screens or Downspouts
  • Damage to siding or windowsills
  • Damage to air conditioning unit
  • Missing or broken shingles
  • granules in your driveway or the bottom of gutter downspouts

If you spot damage in any of those places, there’s a good chance your roof took a few hits, as well. In that case, it’s best to call out a roofing contractor to examine your roof.

ONE – look for dented gutters, gutter screens, or downspouts

TWO – look for damage to siding and windowsills/casings

Look also at any other exposed metal surfaces, like metal fascia on the roof eaves for signs of hail damage impact, even if it looks like a faint ding.

THREE – look for damage to air conditioners or other outdoor items

Air Conditioner Hail Damage

In addition to offering a quick glance sign of further hail damage on the roof, a damaged air conditioner may qualify for insurance replacement.

As a homeowner, it’s equally important to keep a ledger of everything that was damaged on your property. This could be a shed, patio cover, porch, decking, anything that the insurance may cover.

FOUR – look for damage to decks or painted wood surfaces

Decks, fences and other painted or stained surfaces surrounding the home may have sustained hail damage. If you see chipped paint, splinters, or discoloration, it may be the result of hail impact.

Roof Inspection

Hail Damage To Roof Vents And Shingles

Once you’re up on the roof, there’s going to be a few things to look for. Vents, chimneys, sky lights, other features and shingles are on our inspection list.

Hail damage often accompanies wind damage to roofing systems, so you’ll want to look for both.

Check out all the roof vents and features to look for any damage. Look for dents, dings, chipped surfaces, etc.

Roof vent hail damage
Skylight hail damage

For the harder to see impact areas like the chimney covers (below), run your chalk sideways over the surface and it will uncover the hail impact points. For the softer metal vents, the damage will be much more obvious.

Hail Damage To Roof Chimney
https://images.squarespace-cdn.com/content/v1/595cf3072994ca8947944b3f/1586463812103-MGJS2AR67UT3PI1WW6A0/ke17ZwdGBToddI8pDm48kO-nusLtcAdtf47f8bIHOgBZw-zPPgdn4jUwVcJE1ZvWQUxwkmyExglNqGp0IvTJZamWLI2zvYWH8K3-s_4yszcp2ryTI0HqTOaaUohrI8PIRZ5NwDSCpbsZQ0RB-l3w14x_kfU1-FWN1-nxyaZPMPYKMshLAGzx4R3EDFOm1kBS/Cedar-Shake-Roof-Hail-Damage-Located-In-Barrington-Hills-Illinois.jpg

The last, but most important thing to check is the shingles. Hail damage to roof shingles are what buys the roof. You’ll never get a solid insurance claim without shingle damage.

What does hail damage look like on shingles?

Hail damage to roof shingles can be very obvious or very difficult to uncover. It takes a trained eye to spot hail damage to roof shingles.

As you can see on the first image below, the surface granules have been knocked off of the shingle very clearly.

The rest of the pictures make it much harder to notice that the shingle has sustained hail damage.

Hail Damage To Roof Shingle

So what, It’s just a few granules…

You may be surprised at the force it takes knock the surface materials off of a shingle. When this is discovered, the integrity of the shingle has been compromised, and a water leak can develop over time. Even the smallest hail impact on a shingle can lead to a roof leak.

Hail Damage To Roof Shingle

Now it’s your job to determine if there’s enough information here to make an insurance claim. Most insurance companies want to see 8+ hits on the roof within a 10ft x 10ft square on at least 3 sides of the roof.

Mark each hit with chalk so you can accurately determine if there is enough damage to have the homeowner make a claim.

Take pictures of the hail hits to show the homeowner whenever you’re done inspecting the roof. You can also show these pictures to the insurance adjuster whenever they come out for their inspection of the roof.

Now, you should have enough information to determine whether or not the home owner will need a roof replacement.

Metal Roof Hail Damage

Shingles can be tricky when it comes to spotting hail damage, but they’re not the only type of roof out there. You have others like wooden shake, clay, slate and metal roofing.

Wood shingles will split right down the middle after being struck by hail. Clay & slate roofing will have cracks and/or gouges, and metal roofing will have impact dents like we saw on the gutters at the beginning.

Metal roofing is one of the easiest to spot for hail damage.

Here are some examples of hail damage on a metal roof.

Metal Roof Hail Damage

See all hail damage pictures here.

What size hail causes roof damage?

On average, it takes a 1″ or above diameter hail stone to cause damage to common asphalt shingles. When referring to hail sizes, here are a few common objects to compare:

  • Pea  = 1/4-inch in diameter
  • Marble = 1/2-inch in diameter
  • Dime or penny = 3/4-inch in diameter (hail the size of a penny or larger is considered severe)
  • Nickel = 7/8-inch
  • Quarter = 1 inch
  • Golf Ball = 1½  inches
  • Tennis Ball = 2½ inches
  • Baseball = 2¾ inches
  • Tea cup = 3 inches
  • Softball = 4 inches

Several surveys and studies have been completed to show to damage potential of different size hail stones on various types of common roofing materials. Field observations and ice stone impact tests provide some common correlation between stone size and damage potential.

MaterialHailstone Size
3-Tab organic asphalt shingles1″
3-Tab fiberglass asphalt shingles1¼”
Cedar shingles1¼”
Fiber-cement tiles1¼”
Flat concrete tiles1¼”
Heavy cedar shakes1½”
30-year laminated shingles1½”
Built-up gravel roofing2″
S-shaped concrete tiles2″

What does hail damage do to a roof?

The severity of hail damage to a roof depends on several factors, including:

What do I do If I think I have hail damage?

Hard hail impacts or high winds can grip the shingles and cause cracks. This can lead to exposure and tears, leaving your roof with bare spots. Cracked shingles cannot effectively protect your roof from the weather.

Homeowners: It’s very important that you have your contractor come out and inspect the roof with your insurance adjuster. You have to remember the insurance company is looking for reasons NOT to replace your roof. That’s why it’s important to make sure your contractor inspects the roof with the adjuster.

In Summary…

We are experts equipped with the right information and resources, you’ll have a trained eye on your side to spot hail damage. If you are a homeowner or commercial company, we can help you get fair coverage for the losses you’ve sustained.

If you have been experiencing any leaks in the home that could have resulted from the hail damage to roof shingles. Our job is to assist you and get full and fair settlement for all parts of your property.

Schedule Your Free Consultation

Our project specialist will call you to get the details of your project. They’ll answer all your questions and help you select the products that are right for your project and your budget.

Schedule Now

Filed Under: Uncategorized

Residential Roof Replacement Guide 2021

March 9, 2021 by AAC-USofA 13 Comments

Most asphalt shingle roofs last between 20 and 30 years, while those made from tile, metal or slate usually have a longer lifespan.

The whole roofing system works together, including shingles, underlayment, the deck, vents and other parts, to protect your home from the elements – over time, the structure gives out.

While you can make repairs along the way, it’s eventually going to be time for roof replacement.

Residential Roof Replacement and How it Works

If you think your home may need a residential roof replacement anywhere in the USA, your first step should be to request a free roof inspection from one of the area’s expert roofing companies – ACC Roofing & Construction.

Our skilled, professional roofers will schedule a time that works for you to come out and inspect every inch of your roof.

We’ll bring any issues to your attention and make recommendations for repairs or roof replacement. We’ll also provide you with an on-the-spot estimate so you can make the most informed decision possible.

When you’re ready to move forward, we’ll talk to you about timelines. Our goal is to minimize disruption to your schedule while working quickly and efficiently.

We’ll remove your existing roof and replace it with the materials you choose – and if you’re not sure what materials will be best, we can help. Our experts understand that the roofing materials you choose can impact your home’s value, and we’ll discuss your budget and your needs to make sure you’re able to make an informed decision.

How Do You Know if You Need Roof Replacement?

One of the biggest signs that you need a new roof is age. When neighbors start to replace their roofs, you should have yours inspected to find out how much longer it’s likely to last or whether you need roof replacement right away. There are other signs you need roof replacement, too, including:

  • High heating and cooling costs
  • Leaks, even if you can’t see them
  • Missing shingles
  • Cracked or damaged shingles
  • Broken or damaged flashing
  • Algae or moss growing on your roof
  • Water damage inside your home
  • You see ice dams in winter

Each of these signs is worth investigating. You may just need simple roof repairs – and if you do, our roofing team will recommend all the right fixes. If you end up needing a roof replacement, we’ll discuss your needs, your roofing materials options (such as asphalt shingles, tile or slate shingles, metal roofing or another type) and how much the replacement is likely to cost.

The Replacement Process

1. Materials will get delivered to your home 

The first step to your roof replacement is getting all the roofing materials delivered to your home. The material will be placed directly on your roof to keep it safe from thieves and to help your roofer. However, there are instances where the material is placed elsewhere depending on the size of your roof and access.

2. Moving your vehicles out of the way 

When your contractor arrives at your home they’ll make sure all the vehicles are moved out of your driveway or garage. If the vehicle in the garage won’t be used during your replacement then it’s not necessary to move. 

We don’t want to block you or your family from going about your business as usual, but it is best to park your vehicles on the street to avoid any stray debris such as nails or metal flashing. 

3. Setting up protection for your property

The next step of your roof replacement is preparing your property for the roof tear off. For example, they’ll start tarping the ground for the dump zone and set up tarps to cover your shrubbery and landscaping. 

This is where your contractor takes all the necessary steps to ensure they protect your property during your roof replacement. It’s also a good idea for you to protect things on the inside, such as pictures on the wall, and any breakable items that could fall over.

4. Your old roof will be torn off

After your contractor covers everything, they’ll begin tearing off your old roof in sections. They’ll start on the furthest corner of your roof away from your driveway so that they’re always moving towards the dump trailer and new materials. 

After a section is torn off, some installers will stay behind to begin installing your new roof while the others continue tearing off. This saves time and means less traffic on your roof.  

5. Your gutters will be cleaned out

As soon as a section is torn off and cleaned up, your gutters will be cleaned out as well unless they are being replaced.

6. Install begins  

After the tear-off we start to install your roofing material. We’ll systematically work our way around the house following the sections that are torn off.

Once a section is torn off, we’ll lay synthetic felt (underlayment) and install the drip edge. Then we will start the installation of your choosing.

When they’re done with the roof material, we’ll start on all the ridge capping, and vents.

7. Cleaning up after the replacement  

After your new roof has been installed, your contractor is ready to begin the cleanup process. They’ll blow off your roof so that all the leftover debris gets down on the dump tarps.

They’ll also blow out your gutters and downspouts to clear them of any roofing debris. After they get off your roof, they’ll spend a couple of hours on the ground. 

This is when they’ll roll up all the tarps, get their tools, and make sure everything on the ground is cleaned up. To ensure they get all the nails, they’ll go all over your property with a strong magnet. After they leave, it should be like they weren’t there at all. 

8. Inspecting their workmanship

After your roof has been replaced and your property has been cleaned up, we will double-check the finished product. We’ll get on your roof, take a look around, and make sure the quality of the roof matches the high standards you expect when investing in a roof replacement. 

They’ll double-check the areas that are known to leak frequently (around penetrations, skylights, chimneys, etc.) and make sure they’re properly protected. No matter the contractor you hire, they should always inspect their workmanship to ensure your roof was properly installed and all local codes have been followed. 

The job is never finished until you say so

Schedule Your Free Consultation

Our project specialist will call you to get the details of your project. They’ll answer all your questions and help you select the products that are right for your project and your budget.

Schedule Now

Filed Under: Uncategorized

Understand Commercial Flat Roofing in 7 Minutes

March 9, 2021 by AAC-USofA 7 Comments

Understanding Commercial Flat Roofing: The Layers That Matter

Commercial flat roofing isn’t just a surface—it’s a carefully engineered system designed to protect your property. These roofs are made up of three critical layers, each with a specific purpose:

1. Bottom Layer: Manages water drainage to prevent pooling and damage.

2. Middle Layer: Guards against punctures and structural breaches.

3. Top Layer: Shields the roof from weather, UV exposure, and daily wear.

For flat roofs, proper water drainage is non-negotiable. Unlike sloped roofs, flat designs rely on expert engineering to prevent water from pooling. If you’re considering a new roof for your commercial property, don’t overlook the importance of slope—it’s a key factor in ensuring longevity and performance.

The Less-Than-10-Percent Group

“Liquid Applied and Spray Foam Roofing Systems: The Next Layer of Protection”

For superior performance and flexibility, liquid applied and spray foam roofing systems offer advanced solutions for commercial flat roofs. These systems, as detailed in industry guidelines, include hot or cold polymer-modified asphalt, single-component asphalt or coal tar-extended urethane, and two-component urethane elastomers.

Key to Success:

Proper installation begins with meticulous substrate preparation. The surface must be clean, dry, and free of dust, with any cracks or damage carefully patched to ensure a seamless application. This attention to detail creates a durable, waterproof membrane capable of withstanding extreme weather, UV exposure, and daily wear.

Spray foam systems further enhance energy efficiency by providing exceptional insulation, reducing energy costs, and improving interior comfort. Whether choosing liquid applied membranes or spray foam, these roofing systems offer innovative solutions to protect and extend the life of your commercial flat roof.

commercial flat roofing

While liquid applied coatings are highly elastic, self-flashing and easily applied to contoured surfaces, they have low permeability and require uniform thickness. The NRCA offers an online course Design Essentials for Roof Performance: Liquid-applied Roof Membranes for an in-depth look at liquid-applied roof membrane options.

Metal Roofing Systems
As one of the world’s oldest roofing systems, metal roofing began with materials like the bronze tiles on Rome’s ancient Pantheon. Lead roofing later joined bronze as a popular choice for cathedrals and castles throughout Europe during medieval times. Many of today’s low slope metal roofs are made from corrugated galvanized steel – a steel sheet coated with zinc. Copper, aluminum, stainless steel and tin also are used in commercial metal roofing applications. Benefits to metal roofing including longevity, durability and heat resistance. Additionally, metal roofs can withstand high winds and are largely impact resistant. However, the investment for a metal roofing solution likely will be much higher upfront than other flat roofing solutions.

The Metal Construction Association (MCA) offers resources for those interested in learning more about the use of metal as a low slope roofing solution. The MCA touts metal as a preferred low slope roof covering for commercial, institutional and industrial buildings because of its ability to protect against the elements, to allow water to drain away from the roof surface and to keep building contents and occupants dry. To assist building professionals, the MCA conducts numerous technical studies and research projects in partnership with member and industry partners designed. These free resources include bulletins, white papers, manuals and reports.

New Metal Roof System Applications:
Low slope structural metal roofing is commonly known as standing seam roofing and consists of interlocking panels that run vertically along the roof surface. These panels generally come with a painted mill finish or a clear acrylic finish. Some metal roofing used on low slope applications requires machine seaming during installation to ensure a watertight seal. A seaming apparatus is simply rolled along the panels to crimp the panel seams together.
A standing seam design assures adequate draining from rain and snow, effectively eliminating ponding, leaks and related problems. Finally, low slope metal roofs aren’t prone to the degradation experienced by some organic materials, enabling these roofs to better resist the elements. This may result in a longer life span and low annual operating costs.

Metal Roof Restoration Applications:
In retrofit projects, a sub-framing system is attached to the existing flat roof surface to provide a minimum ¼:12 roof pitch. Options for the restoration of a metal roof surface include acrylic coatings made of polymers that cure to form a durable, continuous elastomeric membrane over the surface of the metal roof and can be added to metal roofing systems to address your building’s specific needs around waterproofing, rust and UV protection. These acrylic coatings are designed to adhere to almost any metal surface to form a seamless, watertight seal over the entire roof. Acrylic coatings are water-based, non-flammable and emit no toxic fumes. These systems can withstand the most common types of roof hazards, including ultraviolet light, temperature extremes, mildew, normal foot traffic and building movement.

Vegetative Roof Systems
While not on the list in terms of market share, another roofing system should be mentioned – the vegetative or “green” roof. These roofs have living plants that are typically installed in tray systems on the top of the flat roof surface. Vegetative roofs can effectively provide an advantageous means for storm water control. Keep in mind, a roofing membrane as a base to the system is vitally important to maintaining the roof’s integrity and water tightness. For more information on vegetative roofing systems, be sure to visit Green Roofs for Healthy Cities.

The Basics on Asphalt Roofing Systems

Along with a select number of other well-known manufacturers, IKO Industries offers a full line of asphalt based commercial roofing systems. A long-dependable choice for low slope roofing, asphalt falls into three basic categories: Built Up Roofing, Modified Bitumen and Hybrid Systems (a combination of Mod Bit and BUR). From SBS to APP and BUR, IKO’s asphalt applied membrane systems include base sheets, cap sheets and self-adhered membranes.

Built Up Roofing (BUR) Systems
Popular in North America for more than 100 years, Built Up Roofing (BUR) Systems are composed of alternating layers of bitumen (asphalt) and fabrics called roofing felts. The felts are reinforced with either glass-fiber mats or organic mats (ply sheets) and when joined with the bitumen form a durable roofing membrane.  The number of “plies” on a roof implies the number of layers, i.e. “four plies” denotes a four-layer flat roof membrane system.

BUR systems are redundant, meaning if one layer breaks down, multiple remaining layers provide immediate protection. These systems also offer great tolerance for building stress and resistance to thermal shock, high puncture resistance and outstanding membrane strength and toughness for proven long-term durability.

built up roofing system

BUR systems can include SBS, fiberglass or organic felts and offer many options to suit a variety of building needs. The key to this system is the repetitive layers. BUR also is known for superior fire resistance from external flames. Reflective surfacing options also are available to offer maximum membrane protection, superior puncture resistance and high resistance to foot traffic and mechanical maintenance.

With standard application procedures, IKO BUR Systems offer robust protection for today’s buildings and are available in traditional four-ply. Product options include the following:

Base Sheets – Saturated or coated felts placed as the first ply in some low-slope roof systems.

  • Modiflex MP-180-SS-Base
  • Modiflex MF-95-SS

Felts – Reinforcing fabrics also are called roofing felts or ply sheets. Roofing felts are reinforced with either glass-fiber mats or organic mats.

  • Type IV Glass Ply Sheet
  • Type 6 Glass Ply Sheet
  • No.15 Perforated Felt

Bulk Asphalt – A proven waterproofing material and is suitable for use in selected damp proofing and waterproofing applications.

  • Type 1 Asphalt
  • Type 2 Asphalt
  • Type 3 Asphalt
  • Modi-Melt SEBS Asphalt
  • Easy-MeltTM 200

Modified Bitumen (Mod Bit) Systems
Mod Bit systems include factory-fabricated layers of asphalt that are “modified,” using a rubber or plastic ingredient for increased flexibility and combined with a reinforcement for added strength and stability. Bitumen (or asphalt) is a sticky, black, and viscous liquid or semi-solid form of petroleum. It’s found in natural deposits or may be a refined product and is used for both road surfacing and roofing. Bitumen displays a thermoplastic quality when softened by heat.

In modified bitumen, there are two primary modifiers used today: APP (atactic polypropylene) and SBS (styrene butadiene styrene). APP and SBS refer to the type of polymers that are added to the asphalt. A variety of reinforcements are used with the asphalt, including fiber glass and polyester mats and scrims. Scrim is a reinforcing fabric made from continuous filament yarn in an open mesh construction.

Mod Bit membranes are typically installed as a two- or three-ply (multiply) system. The type of modifier used may determine the method of sheet installation: mopped down using hot asphalt or heat welded to melt the asphalt so that it flows onto the substrate. Seams are sealed by the same technique. The membrane system may be held in place on the roof by fully adhering the base sheet, mechanically attaching the base sheet or using ballast.

High performance modified bitumen roofing and waterproofing systems are quickly installed, easy to maintain and cost efficient. Mod Bit membranes are normally hot mopped like traditional BUR but also may be applied as a torch down product. The Manual outlines some important points to consider with each installation method, including:

  • Hot mopping is generally safer and faster than torching.
  • If hot asphalt is required for other roofing operations to adhere insulation or a base sheet, it’s likely more economical to hot mop the cap sheet as well.
  • Heat welding (also referred to as “torch down”) can evaporate surface moisture from the bonding area.
  • Heat welding preheats and softens material, offering advantages in cold weather.

Mod Bit Systems Options:

Heat Welded Roofing Systems

IKO Heat Welded Roofing Systems include both base sheets and cap sheets in either a granule or smooth surface. A variety of specially designed heat welded systems are offered, including Armourplast™ APP Heat Welded Cap Sheets, the PrevENt™ line of fire rated cap sheets and Torchflex™ SBS Membranes in both base and cap sheets. Designed to reduce labor and installation time, the IKO Torchflex Roofing System can provide large office buildings and commercial warehouses with many years of protection.

heat welded
Mod Bit Roofing System parts
Fully Adhered

IKO Fully Adhered Roofing Systems include those that are adhered with hot mopped asphalt to allow joining of the membrane to the substrate. Roofs are considered fully adhered if applied directly to roof decks or insulation. From PrevENt™ Fire Rated Premium Heavy Duty Cap Sheets to Modiflex™ Cap and Modiflex Base Sheets, these durable fully adhered products will add strength and life to your roofing system.

Fully Adhered Roofing Systems - hot mopped
Mechanically Attached

IKO Mechanically Attached Roofing Systems are known for consistency and durability, and include those that are secured with a fastener system directly into the building’s structural deck. Proven products such as Fast-N-Stick™ Base Sheets ensure a secure and dependable roofing system that contractors can rely on.

Mechanically Attached Roofing System
Fire Rated

IKO Fire Rated Roofing Systems are designed to handle extreme temperatures and to mitigate fire. The PrevENt™ line of premium SBS cap sheets offers enhanced performance with graphite technology for the highest fire resistance rating (Class A) available in a flat roof membrane. Graphite is applied to the upper face of the reinforcement mat during manufacturing of the cap sheet and acts as a fire retardant by expanding rapidly when exposed to high temperatures. In the case of fire, graphite cuts off the supply of oxygen to the flame.

Fire Rated Roofing Systems
Reflective and Eco Friendly

IKO Reflective and Eco Roofing Systems offer reflective properties designed to provide protection from the damaging effects of the sun and ultraviolet radiation. From ArmourCool™ to the new fire resistant Carrara™ ArmourCool HD, these membrane systems install like a standard cap, are reinforced and built to last, providing a substantial contribution towards improving building energy performance and cost savings to the building owner.

Solar Reflective Roofing Systems
Heavy Duty Composite

IKO Premium Heavy-Duty (HD) Composite Roofing Systems are superior membranes for the most demanding building applications, offering dimensional stability and puncture resistance. Offered throughout the full line of asphalt systems, these HD membrane products include Fast-N-Stick, Torchflex and PrevENt membranes, as well as the new eco-friendly Carrara ArmourCool HD. Premium Heavy Duty Composite Systems install like a standard cap and contractors can expect better “lay flat” tendencies with increased overall strength.

Heavy-Duty Composite Roofing Systems
Cold Applied

IKO Cold-Applied Roofing Systems include cold process adhesives that are suitable for use with vapour retarders and Modiflex Base and Cap Sheets. These cold-applied systems also are designed to adhere IKO Modiflex modified bitumen membranes to steep and vertical surfaces.

Cold-Applied Roofing Systems
Self-Adhered

IKO Self-Adhered Roofing Systems include the Armourbond™ and Armourvent™ line of membranes. These membranes serve as an excellent base for the application of a heat-welded cap sheet or as a flashing detail designed for use in flame-sensitive areas. IKO S.A.M. Adhesive and Adhesive LVC products provide a quick-drying surface preparation for installing these membranes.

Self-Adhered Roofing Systems
APP Mod Bit

Durable, reinforced and easy to install, IKO APP Modified Bitumen Roofing Systems are coated on both sides with APP Mod Bit to help protect against water leakage and extreme weather variances. IKO Armourplast Classic and Armourplast Granular APP Modified Bitumen Membranes may be installed as a cap sheet or base sheet, depending on the application.

APP Modified Bitumen Roofing System
Mod Bit/BUR Hybrid Roofing System
Mod Bit/BUR Hybrid Systems

Hybrid Systems include a very small, specialized category of low slope commercial roofing systems using a combination of Mod Bit and BUR. These hybrid systems are specified for certain situations and are typically comprised of two or three hot-mopped glass fiber felts followed by a modified bitumen cap sheet. The Modiflex family of base and cap sheets are a preferred choice by IKO contractors.

Single Ply 101

Single Ply Membrane Systems
The single ply roofing systems market has grown exponentially in the past 40 years. Considered a reliable commercial roofing application, single plies offer an extended service life and require relatively low maintenance. In many cases, commercial single ply roofing systems are backed by a manufacturer’s warranty.

The Manual provides a detailed history of the background on contemporary roof systems as well as a discussion of the materials and research that are part of that history. The authors state that a combination of economic and technological factors led to what they refer to as the “single ply revolution,” including:

  • Rapidly increasing petroleum prices during the 1970’s energy crisis
  • Frustration with conventional bituminous roofing provided a market of building owners and architects eager to try something new
  • Long-term trends toward prefabrication favored the less labor-intensive field installation of new, lighter materials versus the heavy field labor required of the conventional systems

The Single Ply Roofing Industry (SPRI) classifies single ply commercial roofing membranes as flexible sheets of compounded synthetic materials that are manufactured in a factory to strict quality control requirements. Single ply roofing systems provide strength, flexibility and long-lasting durability. The inherent advantages of these pre-fabricated sheets are the consistency in quality of the products that are manufactured, the versatility in their attachment methods and their broader applicability.

There are two major categories of single ply membranes: thermosets and thermoplastics.

Thermoset membranes are compounded from rubber polymers. The most commonly used polymer is EPDM or Ethylene Propylene Diene Monomer. EPDM is a durable rubber roofing solution and available in both black and white. Thermoset membranes are successful for use as roofing materials because of their proven ability to withstand the potentially damaging effects of sunlight and most common chemicals generally found on roofs. The EPDM Roofing Association (ERA) offers detailed information on EPDM roof resources.

Thermoplastic membranes are fabricated from polymers which soften when heated and harden when cooled. These factory-made sheets are applied on the job site using one of the standard installation techniques for sheet membrane systems (fully adhered, mechanically attached or ballasted). This process is repetitive provided the material is not heated above the point at which decomposition occurs. The membranes can be welded together with heat or solvents, and when welded, develop a bond strength which equals or surpasses the strength of the base material. Polyvinyl chloride (PVC), blends or alloys of PVC and thermoplastic polyolefins (TPO) are the most common types of thermoplastic roofing membranes.

Determining the best choice for a single ply system depends on several factors, including cost. However, the decision should not be based on cost alone. Other important considerations are building height, wind exposure, anticipated roof traffic and aesthetics. In any case, consider the track record of the manufacturer and the reputation of the roofing contractor.

Thermoplastic membrane

Single Ply Attachment Methods
The project and situation will help determine the best attachment method. If the roof deck can withstand the weight, a ballasted (loose rock) roof may be the best option. But if the slope of the roof is greater than 2:12, then this system may not be appropriate. Other limitations to the use of a ballasted system may include roof height, proximity to shorelines and other high wind zones and availability of ballast.

A deck that accepts fasteners easily, such as steel or wood, makes a good substrate for a mechanically fastened membrane. These systems can be designed to provide the necessary resistance to known wind forces and are not subject to slope limitations.

Another attachment method is a fully adhered system, in which the membrane is attached to the substrate using a specified adhesive. Depending on the membrane, the adhesive may be solvent-based, water-based or asphalt. The finished surface of an adhered roof is smooth. Colored membranes may be used which may provide an attractive aesthetic to the building’s appearance.

The Value of Insulation and Vapor Retarders

Insulation is a vitally important component in roof systems, serving several ancillary functions in addition to the primary purpose of energy conservation, often leading to a reduction in heating and cooling costs. Insulating materials are designed to reduce the flow of heat, either from or into a building and generally installed either just below or immediately above the roofing membrane, depending on the roofing system employed. Insulation types include rigid or semi-rigid boards or panels of extruded or expanded polystyrene, polyisocyanurate, fiberboard, fiber glass and various composite insulations.

Polyisocyanurate (polyiso) is a closed-cell, rigid foam board insulation used in roof and wall assemblies within commercial and residential buildings of all types. Because of its high thermal performance, it is the product of choice for energy-aware architects, specifiers, builders, building owners, contractors and consumers. As one of North America’s most widely used, readily available and cost-effective insulation products, Polyiso has been cited by the U.S. Environmental Protection Agency for its responsible impact on the environment. As an example, IKOTherm Insulation and Cover Boards are dimensionally stable and compatible with a variety of roofing systems.

While insulation is an important part of a roof system, it can increase the probability of entrapping water within the roof assembly. This threat of condensation creates the possible need for another roof-system component: a vapour retarder or vapour barrier. Vapour retarders are designed to intercept the flow of water vapor into the insulation, where it can reduce the insulation’s thermal resistance, form a source of leaking water, and possibly destroy the insulation itself. The IKO MVP Modified Vapour Protector is a vapour retarder that creates a moisture trap, preventing the venting of vapour downward into the building interior during changing weather.

Other Important Considerations

Maintenance
Regular inspection and maintenance of a roofing system is paramount to its durability. A detailed inspection should be conducted at least once a year by a roofing professional. Additional inspections are necessary after any major weather event. Keep in mind, inspections may indicate the need for repairs. Be sure those repairs are in accordance with the manufacturer’s warranty and made by a licensed roofing contractor.

Repair or Replace?
How do you know when to replace your commercial roof system? Make sure to hire a licensed roofing contractor or inspector to assess your existing system. The roofing professional will inspect the roof for damage based on the building’s use, climate concerns, building codes, energy requirements and may suggest possible repair or replacement options depending on the age and condition of the roofing system.

Warranties – Why Do I Need One and What Do They Provide?
Most commercial roofing systems come with a limited 10-year warranty. Warranty coverage certainly can vary, depending on the manufacturer. While understanding the details of the roofing system is important, there are several factors you need to know about warranties and why they are important. Keep in mind, when purchasing a new roof system, there are two warranties to consider: First is the manufacturer’s warranty. In general, these warranties cover defects in the manufacture of the roof membrane. The NRCA strongly suggests that all building professionals research roofing warranties options. Once the project is complete, be sure the contractor provides you with a certificate for your records. Second, the roofing contractor should provide a warranty covering his workmanship. Typically, this covers installation and related issues and should contain what items are covered and what will void them. Many contractors offer one or two years of coverage, however, there is no industry standard.

How Do I Make My Final Decision on a Commercial Roof System?
If you’ve come this far in the overview, you’ve read about the myriad of system options for commercial roofs. While the choices are numerous, you may have narrowed it down to what best suits the needs of your project and budget. As mentioned previously, the NRCA’s Everybody Needs a Roof micro-site provides a great overview for facility personnel and building owners to help them understand the characteristics and differences among low-slope roof membranes.

Additional Resources:

  • The Asphalt Roofing Manufacturers Association (ARMA) is a trade association representing North America’s asphalt roofing manufacturing companies and their raw material suppliers. The association include many North American manufacturers of asphalt shingles and asphalt low slope roof membrane systems.
  • Cool Roof Rating Council – The Cool Roof Rating Council (CRRC) is an independent organization that developed a system for providing building code bodies, energy service providers and architects/specifiers with accurate data about roof surfaces to help improve the energy efficiency of buildings.
  • EPDM Roofing Association – The EPDM Roofing Association, known as ERA, is a trade association representing the manufacturers of EPDM roofing products and their suppliers.
  • Polyisocyanurate Manufacturers Association (PIMA) PIMA is a trade association representing the manufacturers and suppliers of polyiso insulation throughout North America.
  • RCI – RCI, Inc., The Institute of Roofing, Waterproofing, & Building Envelope Professionals, represents the interests of the roof consulting profession and provides for the professional development of its members to convey the consultant’s perspective to the roofing industry and public.
  • RedVector.com Red Vector offers online education for professionals in the engineering, architectural, interior design, construction, land surveying, building inspection and landscape architecture industries.
  • RICOWI – The Roofing Industry Committee on Weather Issues, Inc. (RICOWI) was established in 1990 as a non-profit organization to identify and address important technical issues related to the cause of roofing wind damage.


Protect your investment with advanced roofing solutions.

Contact us today for a consultation and discover how liquid applied or spray foam systems can elevate your commercial roof’s performance!

GET YOUR FREE CONSULTATION

Filed Under: Uncategorized

Primary Sidebar

Updates, News, and Free Storm Tracker Via Email

Follow Us

Recent Posts

  • Rebuilding Lives After Wildfires and Winds in LA and Orange County
  • Home affected by storm damage? Here’s what to know about your claims adjuster
  • Scared to look at your roof after the hail storm? Here’s what to look for.
  • Getting Lowballed? Insurance Claim Scope of Loss Uncovered
  • Wind and Hail Inspection: Inspect your Property like a Pro

Recent Comments

  • Jorgedes on Scared to look at your roof after the hail storm? Here’s what to look for.
  • Josephpug on Scared to look at your roof after the hail storm? Here’s what to look for.
  • Jorgedes on Scared to look at your roof after the hail storm? Here’s what to look for.
  • KennethNeone on Scared to look at your roof after the hail storm? Here’s what to look for.
  • GictorClota on Scared to look at your roof after the hail storm? Here’s what to look for.

Archives

  • January 2025
  • April 2021
  • March 2021

Categories

  • Uncategorized

Meta

  • Log in
  • Entries feed
  • Comments feed
  • WordPress.org

Footer

Contact Information

All American Construction
317 S. Beachwood Dr.
Burbank, CA 91506
Email: solutions@coreypate.com
Dial: 818-403-3631


Follow us

Other Services

Emergency Roof Repair
Siding
Gutters
Windows
Painting

Insurance Claims


Service Areas

Los Angeles CA.
Orange County CA.
Colorado Springs – CO.

Copyright © 2025 All American Construction